Second battle
Build independent databases and a complete content dependency chain in an empty scene, then finish a custom battle that previews intents, selects targets, resolves cards, and advances turns
After First battle, you have verified cards, statuses, enemy intents, and turn progression. Now rebuild that chain from an empty scene so every setting has a clear counterpart in the assets created later and in the final runtime result.
Six asset types, from status to encounter
The six content types are not independent settings. Embermark is created first as a status that behavior graphs can reference. Ember Strike then uses it to define card resolution, enters Ember Trial Deck, and becomes the draw source for Trial Hero. Trial Dummy reuses the same status through another behavior graph. Finally, Ember Trial brings both sides and the battle rules together.
| Creation order | Asset | Dependency and purpose |
|---|---|---|
| 1 | Status Embermark | Provides a visible stacking marker referenced by both card and enemy behaviors |
| 2 | Card Ember Strike | Costs 1 energy, deals 6 damage, and applies 1 stack of Embermark |
| 3 | Deck Ember Trial Deck | Contains 10 copies of Ember Strike, keeping the opening hand and turn draws deterministic |
| 4 | Player Trial Hero | Uses Ember Trial Deck as the starting deck and provides 60 HP and 3 base energy |
| 5 | Enemy Trial Dummy | Previews an Attack for 3, then deals damage and applies 1 stack of Embermark when it acts |
| 6 | Encounter Ember Trial | Connects the player, enemy, reward deck, and turn rules, then starts the battle from the scene |
This dependency chain starts with a scene that can run a battle. After initializing the scene, deactivate all six preset databases and leave only the new databases from this walkthrough Active. The selectors will then exclude Demo content.
1. Initialize the battle scene and switch databases
Initialize the scene objects
Create a new scene in Unity, then open Game Card System:
Tools > TinyGiants > GCS > Game Card System
Click Initialize System. GCS keeps the existing Main Camera and creates GameCardManager, EventSystem, Background, Battle Runtime, and Battle Fx Directors beside it.
Expand Battle Runtime. It should contain the battle panel, hand area, card pile areas, and presentation objects. Initialization also adds GameCardEncounterBootstrap to GameCardManager and registers the six preset database types.
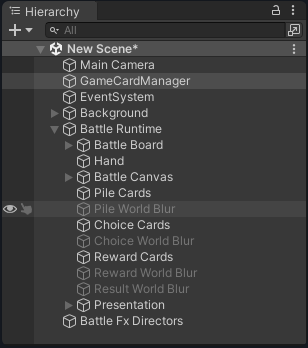
To rule out scene wiring problems first, temporarily select a preset encounter under Encounter Bootstrap and enter Play Mode to confirm that the battle starts. Exit Play Mode and return to this scene, then switch the content sources to the databases created in this walkthrough. See Battle scenes and System dashboard for the initialized objects and their responsibilities.
Switch to six empty databases
Return to Edit Mode and click + New once in each of the Card, Deck, Player, Enemy, Status, and Encounter sections. If the project does not already contain assets with these names, the new databases use the defaults below. When a matching asset already exists, Unity appends a number automatically. In every later step, select the corresponding database created during this walkthrough.
| Section | Default name |
|---|---|
| Card | NewCardDatabase |
| Deck | NewDeckDatabase |
| Player | NewPlayerUnitDatabase |
| Enemy | NewEnemyUnitDatabase |
| Status | NewStatusDatabase |
| Encounter | NewEncounterDatabase |
After mounting all six databases, switch each preset database to Inactive and leave each new database Active. Every section should show 1/2 Active.
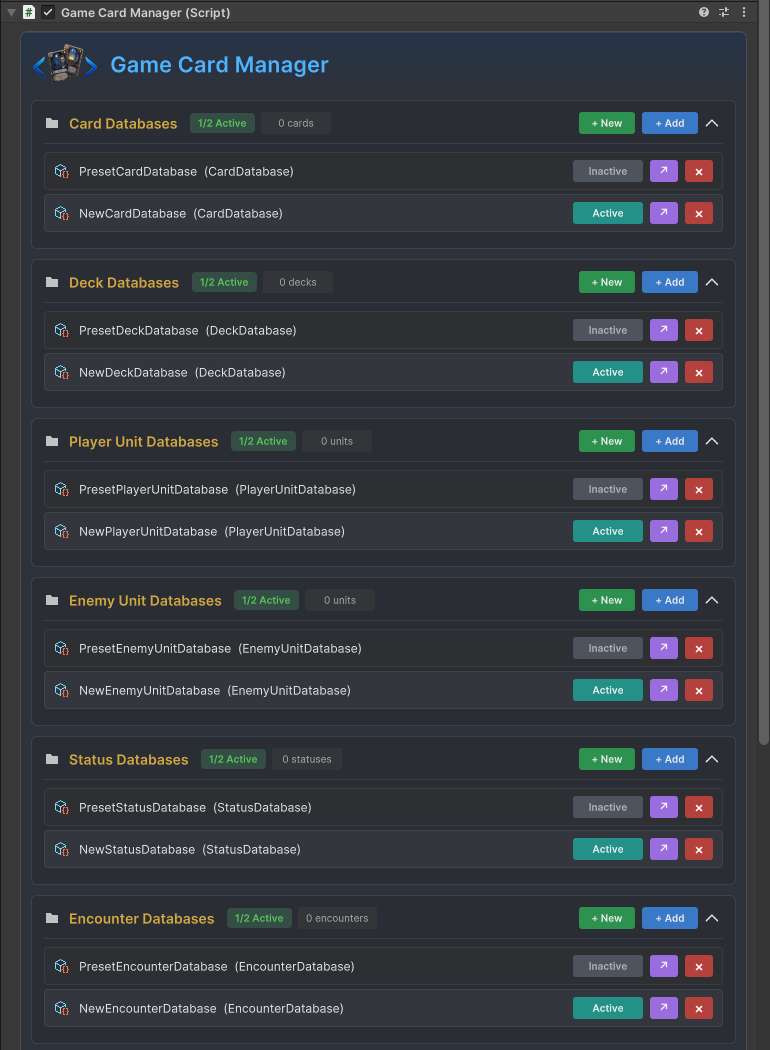
1/2 Active means that two databases remain mounted in the section, but Game Card Editor and GameCardManager enumerate only enabled databases. Switching Active does not delete preset assets or invalidate saved direct references. You can enable the preset database again whenever you need to compare the Demo.
Open Game Card Editor through Tools > TinyGiants > GCS > Game Card Editor. Switch through Card, Deck, Player, Enemy, Status, and Encounter in order. All six modes should read the new active databases and show empty lists.
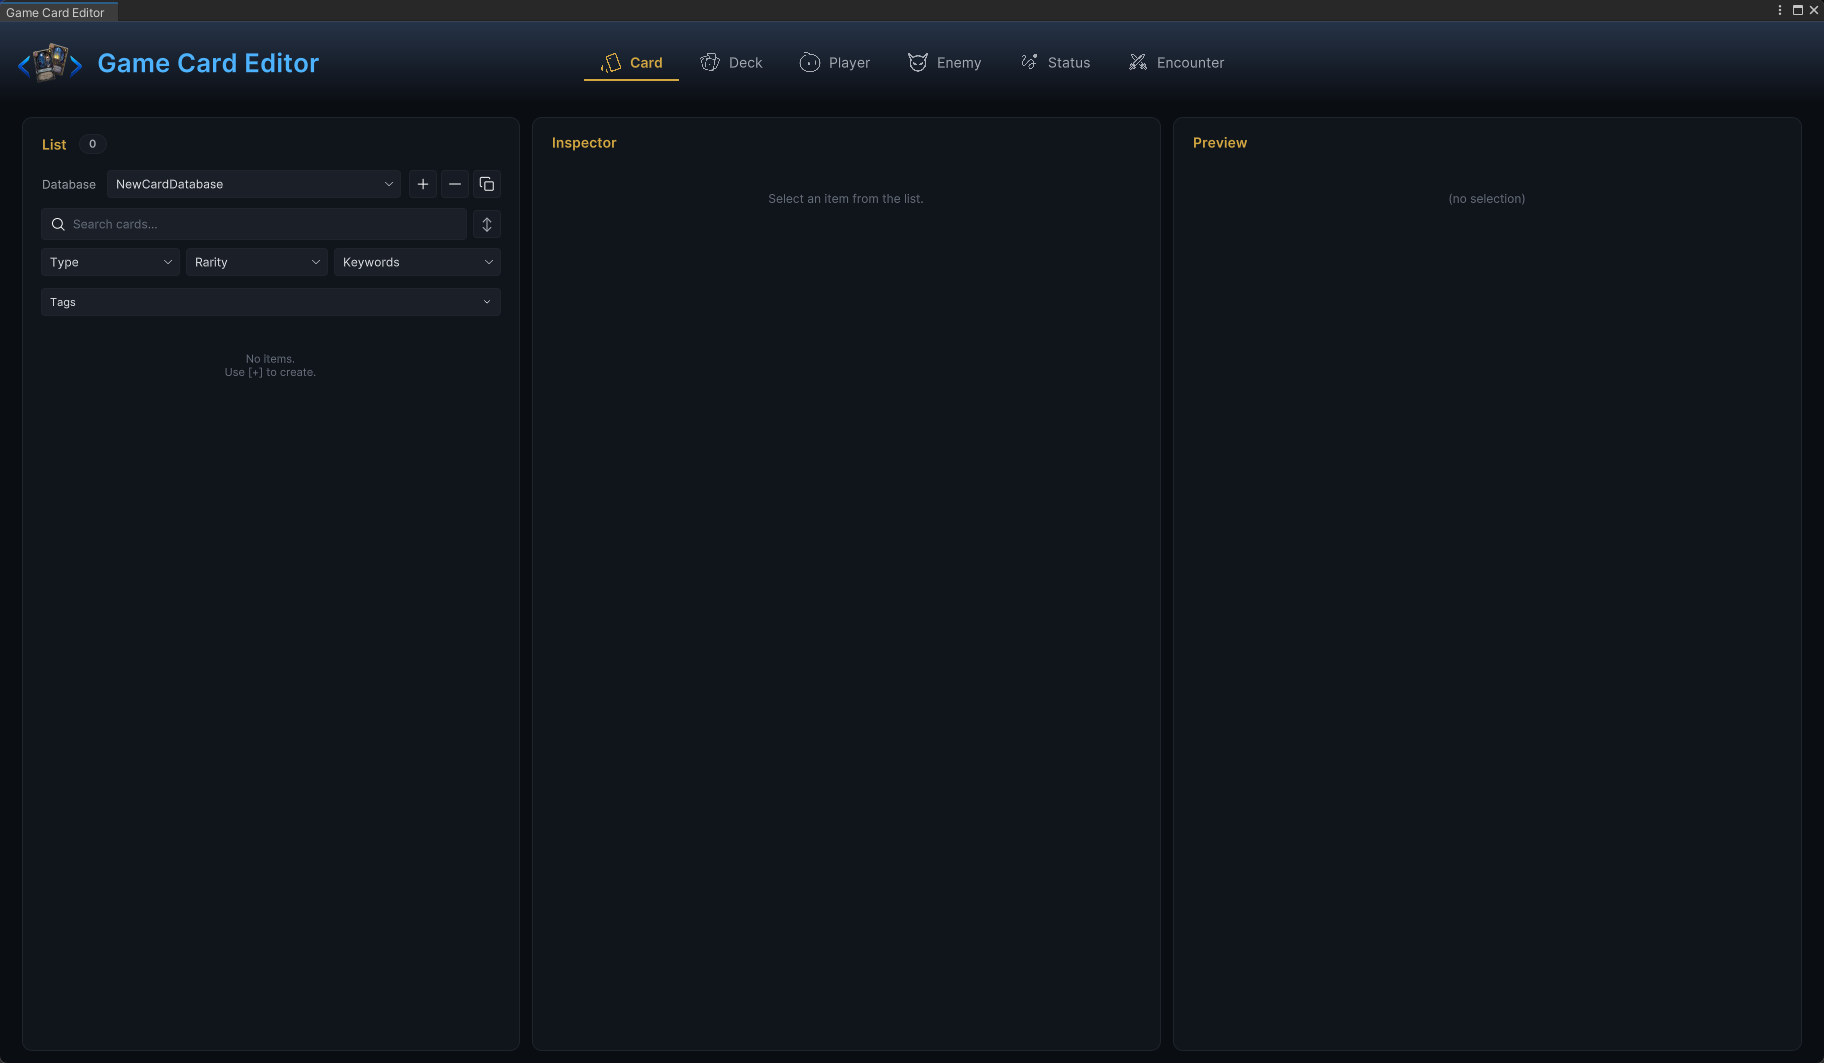
Card mode now reads the empty NewCardDatabase. The other five modes should also show their respective new databases and empty lists. Once all six modes are consistent, use the + above a list to create content. Each new asset is written to the currently selected database.
2. Build card behavior from a shared status
Make Embermark available for references
Switch to Status, confirm that the database created in this walkthrough is selected, then click the + above the list to create Embermark.
| Field | Value |
|---|---|
| Name | Embermark |
| Description | Marked by embers. |
| Type | Debuff |
| Tags | Tutorial |
| Icon | Status_Burn |
| Stack Rule | Additive |
| Max Stacks | 9 |
| Decay Rule | Never |
| Show Stack Count | Enabled |
| Behavior | Leave empty, with no triggers |
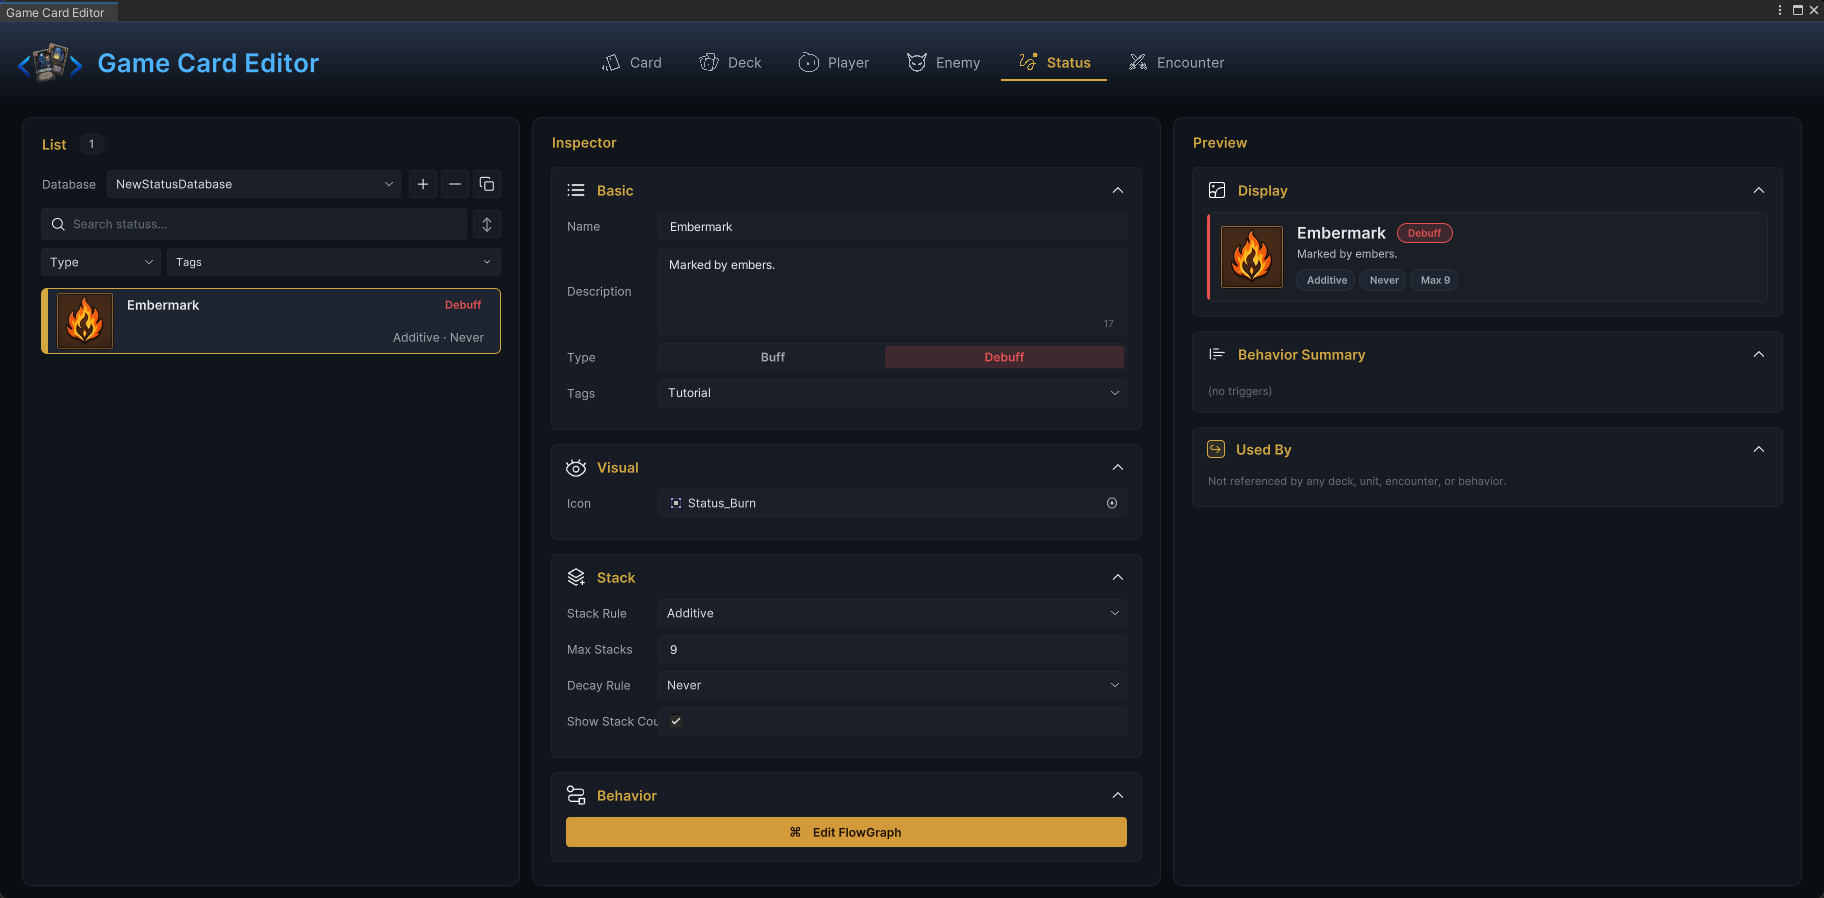
Behavior Summary remains (no triggers). Embermark serves only as a visible, stackable marker in this battle. It does not deal damage by itself and does not decrease automatically because Decay Rule = Never. After you save it, the Change Status nodes on the card and enemy can select it. Status authoring covers the complete relationship between status fields and behavior triggers.
Make Ember Strike resolve damage and status
Switch to Card, confirm that the database created in this walkthrough is selected, then click the + above the list to create Ember Strike. Use the basic fields to define its cost, target, classification, and presentation.
| Field | Value |
|---|---|
| Name | Ember Strike |
| Description | Deal 6 damage. Apply 1 Embermark. |
| Cost | 1 |
| Type | Support |
| Rarity | Common |
| Target | Single Enemy |
| Tags | Attack |
| Keywords | Leave empty |
| Upgrade | None |
| Icon | Study |
| Template | Support |
Support is the card Type, which classifies the card and appears on its face; Attack is a separate Tag that lets filters and custom rules recognize it as an attack card; Template = Support selects the card Prefab used by the preview and runtime.
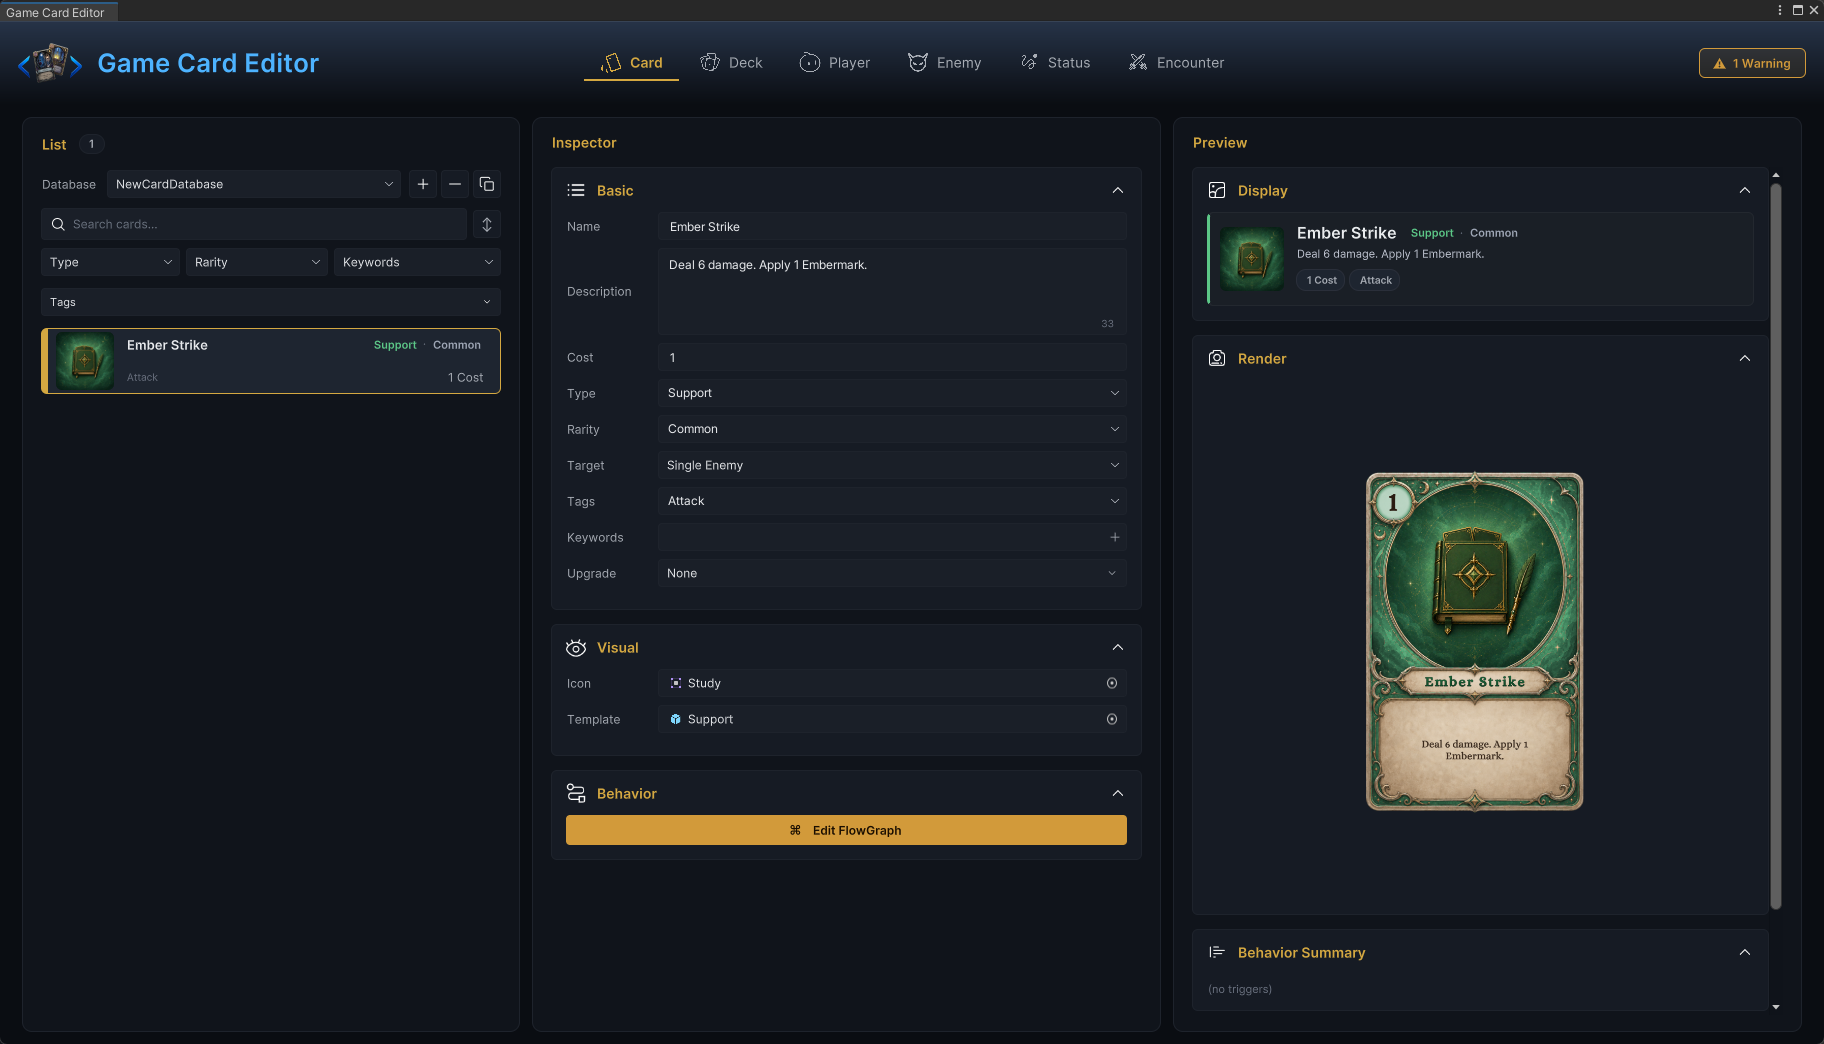
The 1 Warning in the upper-right corner and (no triggers) in Behavior Summary both come from the empty behavior graph. The card data is complete, but playing it does not resolve anything yet. Click Edit FlowGraph and build the gameplay chain.
On Card Played → Deal Damage → Change Status
| Node | Field | Value |
|---|---|---|
| Deal Damage | Target | Opponent |
| Amount | 6 | |
| Ignore Armor | Disabled | |
| Change Status | Target | Opponent |
| Amount | 1 | |
| Mode | Delta | |
| Status | Embermark |
Opponent reads the selected enemy and Deal Damage resolves 6 base damage, Change Status adds 1 stack of Embermark if that enemy survives, killing it skips status application without choosing another enemy, connect presentation nodes after the gameplay nodes
Play VFX → Play SFX → Show Floating Text
| Node | Field | Value |
|---|---|---|
| Play VFX | Target | Opponent |
| Anchor | On Unit | |
| Prefab | VFX_BurnIgnite | |
| Lifetime | 0, automatic | |
| Play SFX | Clip | Mage2 |
| Volume | 1 | |
| Show Floating Text | Target | Opponent |
| Content | Amount | |
| Amount | Switch to an input port and connect Deal Damage → Dealt | |
| Include Sign | Enabled | |
| Custom Color | Disabled | |
| Scale | 1 | |
| Duration | 1 | |
| Offset | (0, 0, 0) |
Organize the three presentation nodes as Play Effect in this order:
- Set
ContentonShow Floating TexttoAmount, click the small circle to the right ofAmountto switch it to an input port, then connectDealtfromDeal Damage. - Leave the three presentation nodes ungrouped for now, close the FlowGraph window, then reopen it through Edit FlowGraph on
Ember Strike.Show Floating Textrefreshes to the Damage style based on the direct source ofDealt. - Select the three presentation nodes and press
Ctrl+G. TheDealtdata connection is preserved automatically as a Group boundary port. - Rename the default
GrouptoPlay Effect. Double-click to enter the group, then click the parameter labels that should remain visible in the parent graph to exposePrefab,Clip,Include Sign,Custom Color,Scale, andDuration. - Return to the parent graph and connect the flow output of
Change Statusto the flow input ofPlay Effect.
The two FlowGraph screenshots record layouts with static Amount = 6 and Amount = 3. These values are the base damage values for the card and enemy Deal Damage nodes.
The current Editor no longer requires a manual Kind selection. When you build the graphs with the steps above, the canvas includes an additional Deal Damage → Dealt data connection, and Amount reads the actual damage after armor and Hook modifications.
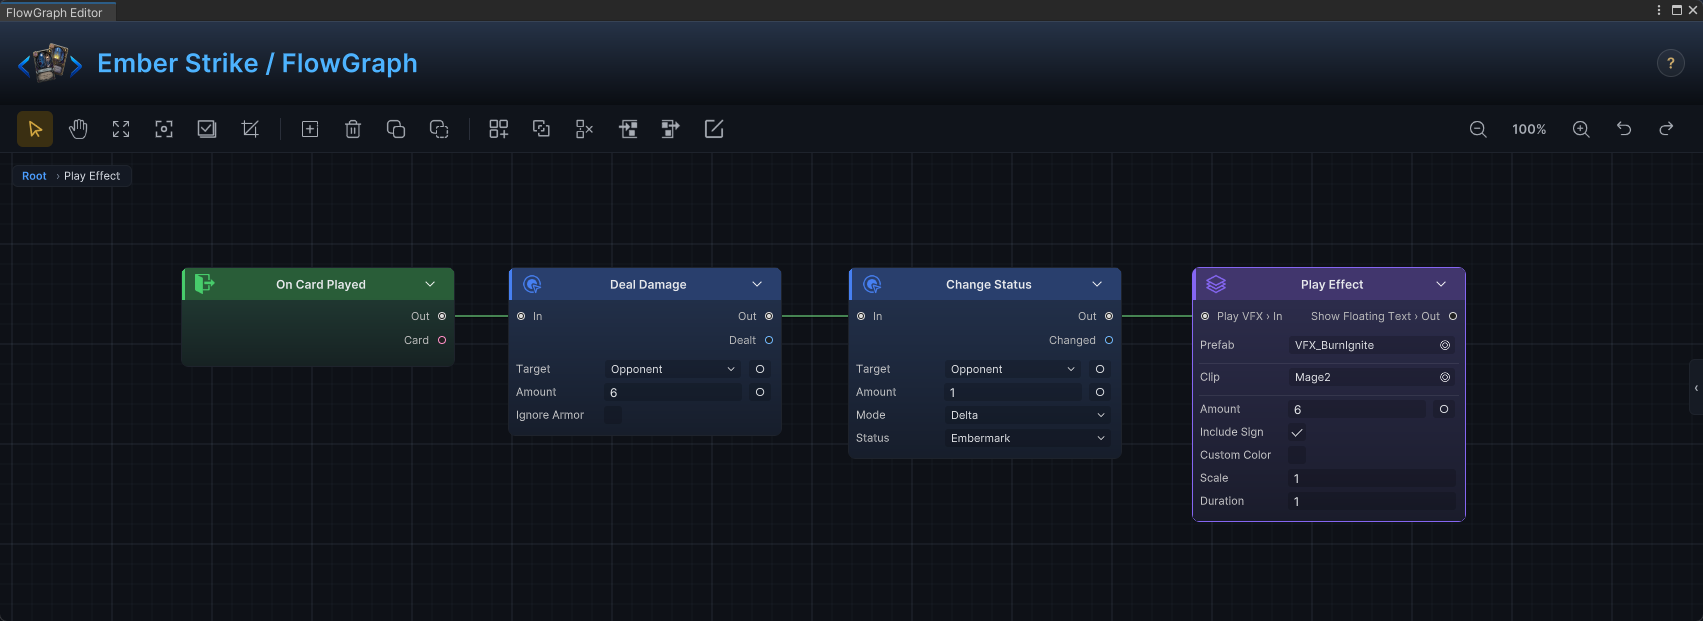
The path from On Card Played to Play Effect is now fully connected. The card can resolve damage, status, and presentation. FlowGraph Editor covers node connections, exposed Group parameters, and actual resolved values. The next step adds the card to a deck so the player can draw it in battle.
3. Give the card to the player, then add an opponent
Turn executable cards into a draw source with a deck
Switch to Deck, click the + above the list to create Ember Trial Deck, then set Copies for Ember Strike to 10.
| Field | Value |
|---|---|
| Name | Ember Trial Deck |
| Description | Ten Ember Strikes for the second-battle tutorial. |
| Tags | Leave empty |
| Icon | Deck_Warrior_Start |
| Cards | Ember Strike × 10 |
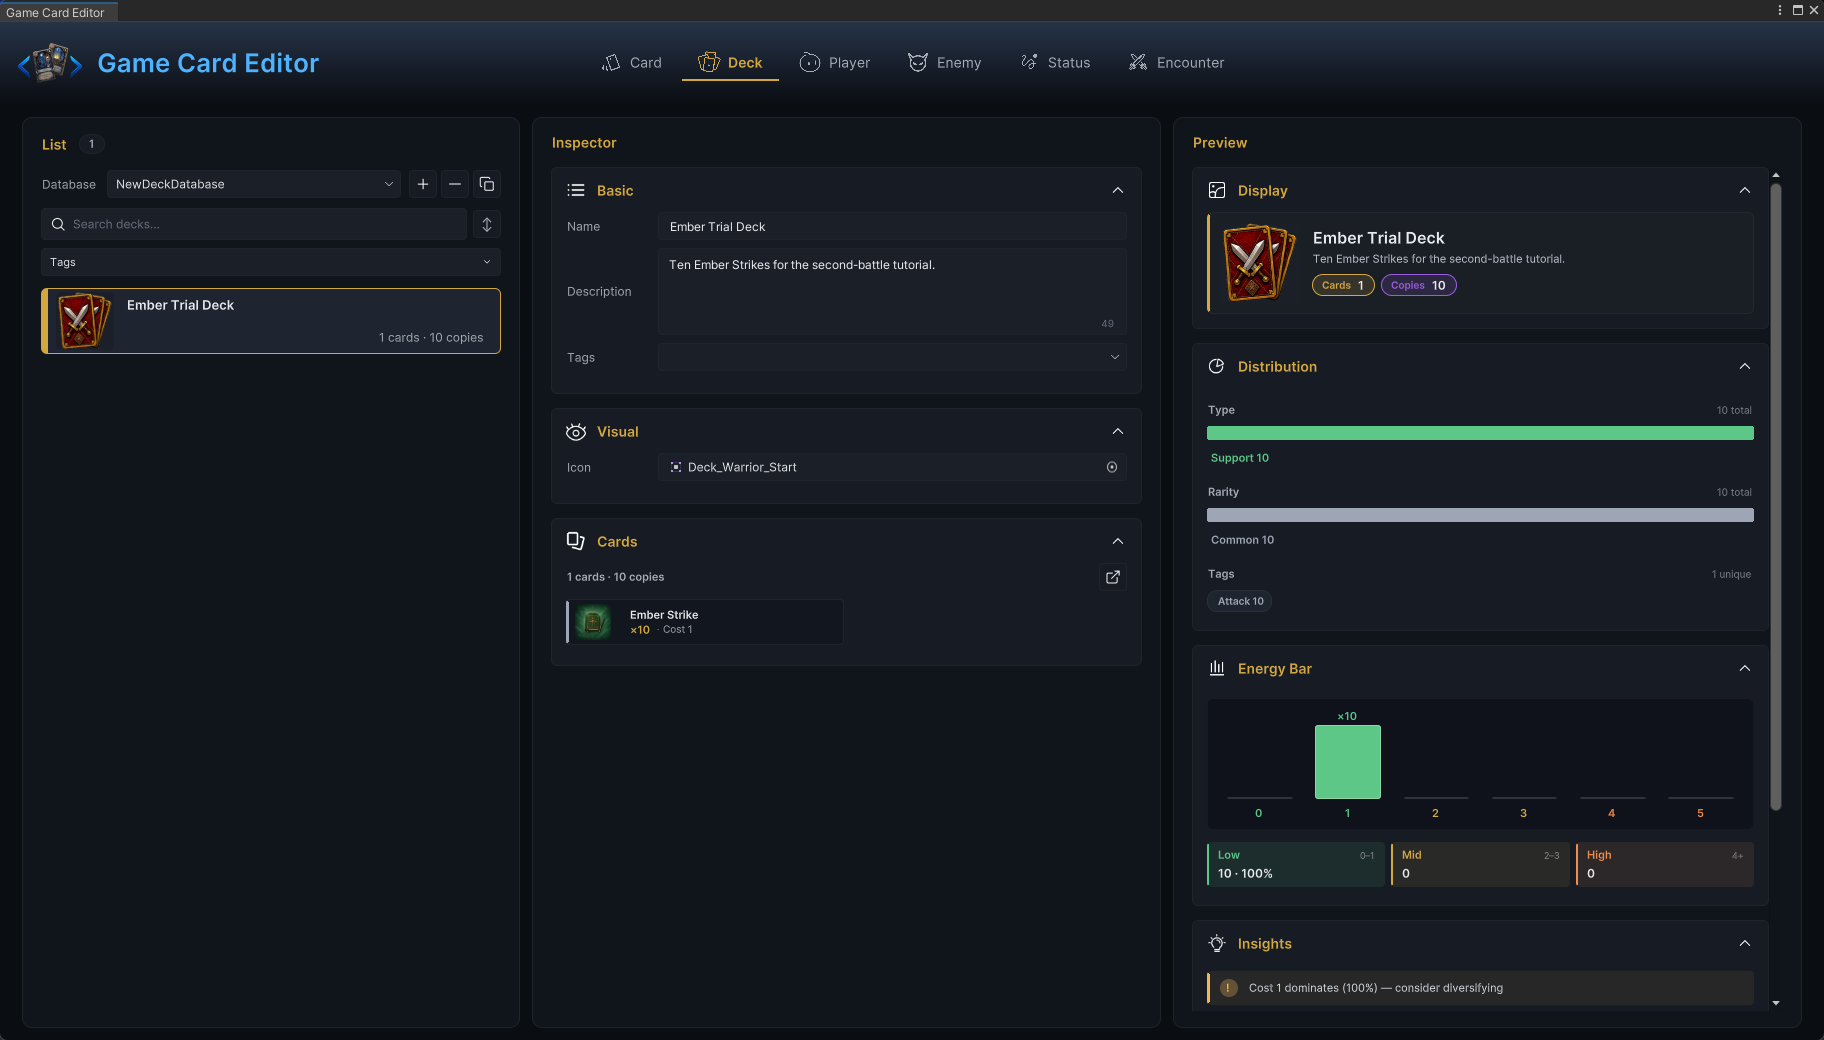
1 cards · 10 copies means that the deck has one unique card entry and ten runtime cards in total. Both the 5-card opening hand and the 5 cards drawn on the next turn contain only Ember Strike. See Deck authoring for deck entries, Copies, and draw sources. This deck must still become the player's Starting Deck before it enters battle.
Bring the deck into battle with the player
Switch to Player, click the + above the list to create Trial Hero, then select the completed Ember Trial Deck under Deck.
| Section | Field | Value |
|---|---|---|
| Basic | Name | Trial Hero |
| Description | A tutorial player with a guaranteed Ember Strike draw. | |
| Tags | Leave empty | |
| Visual | Icon | Avatar |
| Template | Prefab | |
| Attributes | Base HP | 60 |
| Base Energy | 3 | |
| Deck | Starting Deck | Ember Trial Deck |
| Energy | Name | Energy |
| Description | tutorial energy | |
| Icon | Energy |
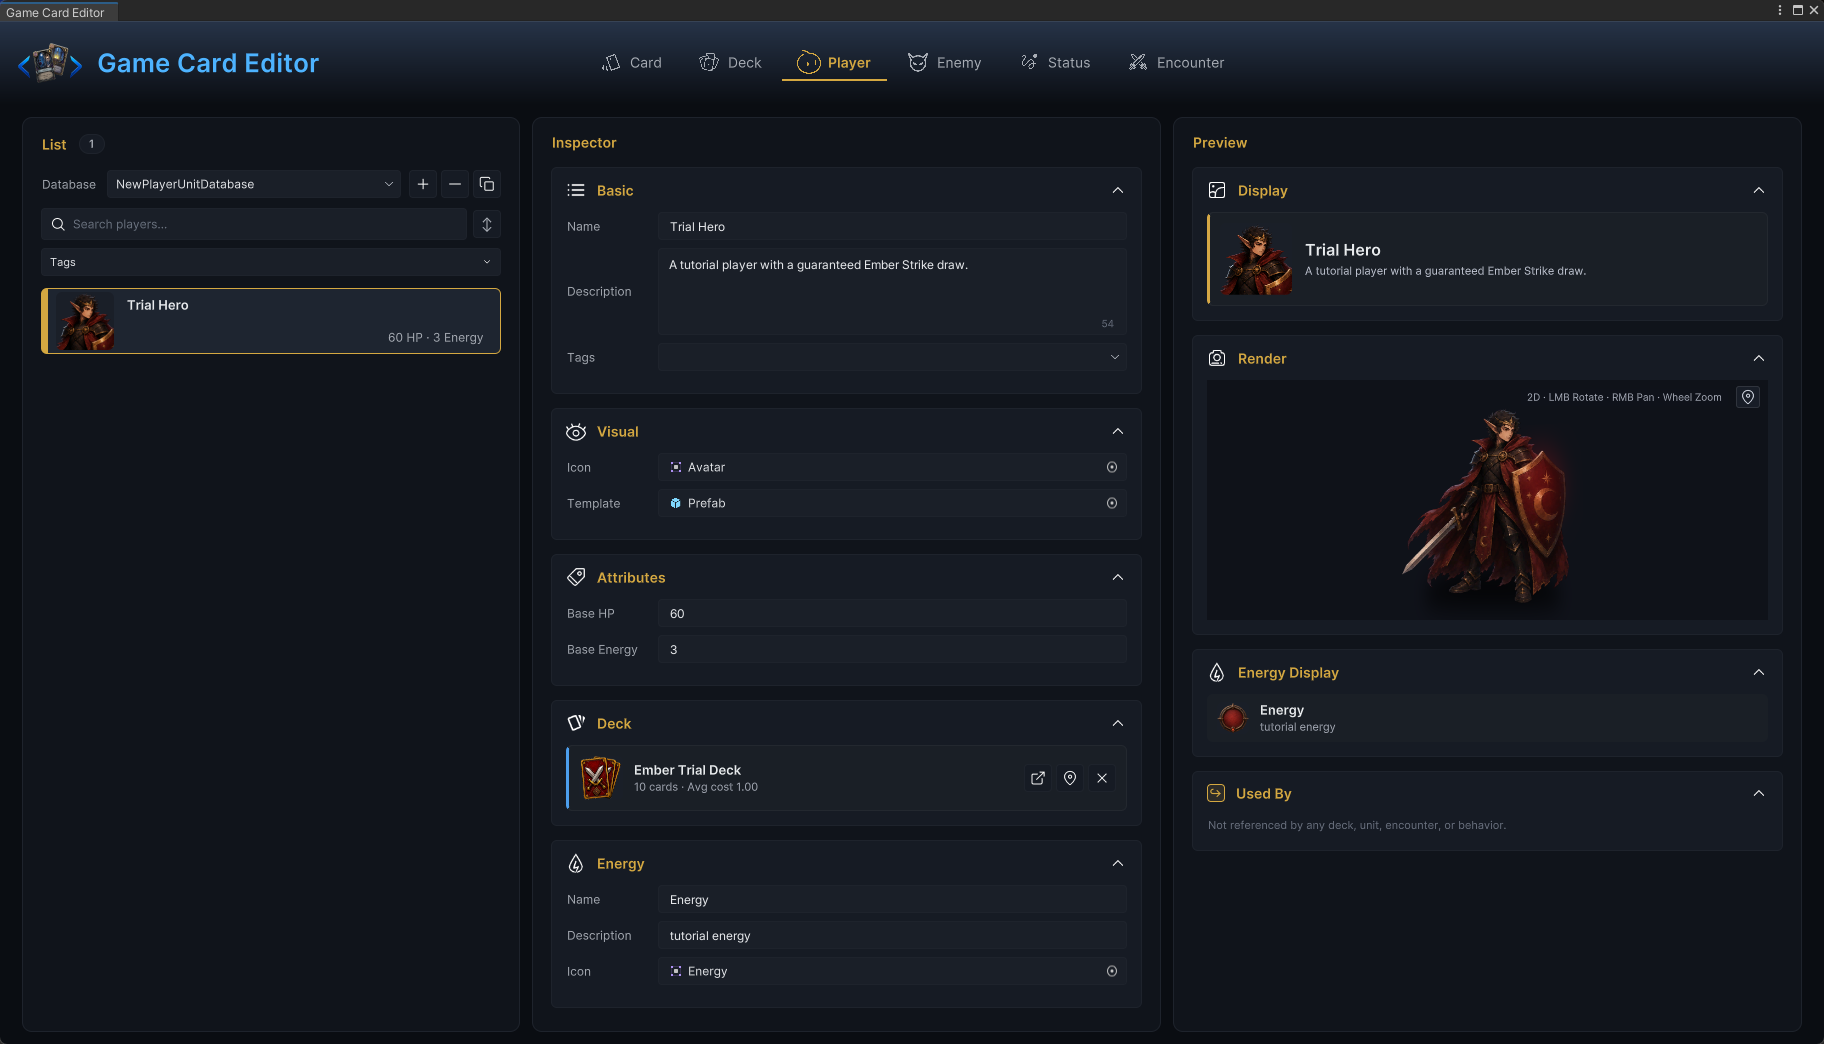
The player preview, 60 HP · 3 Energy, and the ten-card starting deck complete the player configuration. Starting Deck determines the library that enters battle. The Energy section defines only the resource name, description, and icon shown in the UI. See Player authoring for all related fields.
Bind the enemy preview and action with an intent
The battle still needs an opponent that can preview and execute an action. Switch to Enemy, click the + above the list to create Trial Dummy, then configure its health, tier, and presentation assets.
| Field | Value |
|---|---|
| Name | Trial Dummy |
| Description | A predictable tutorial enemy. |
| Tier | Normal |
| Tags | Leave empty |
| Icon | Avatar |
| Template | Prefab |
| HP Min | 24 |
| HP Max | 24 |
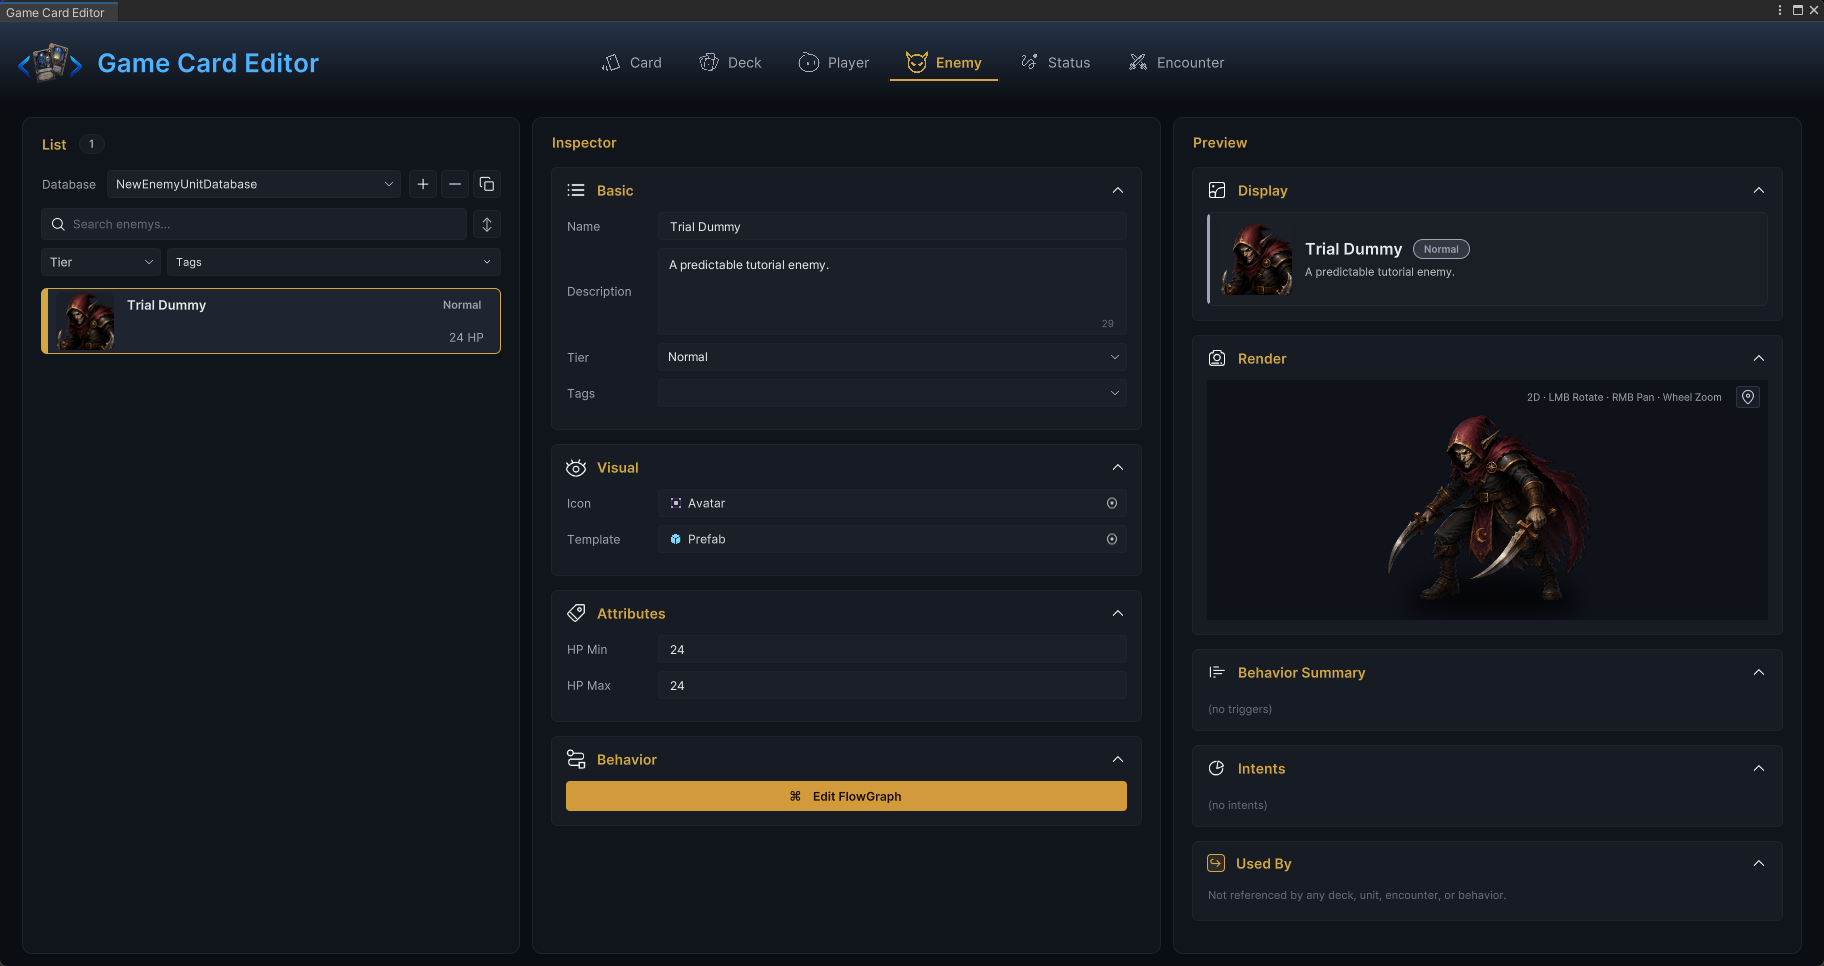
The current 24 HP and character preview define only the enemy's basic data and appearance. Behavior Summary and Intents are still empty. Click Edit FlowGraph and use Leaf Intent to bind the Attack preview to the path executed on the enemy turn.
On Enemy Behavior Start → Leaf Intent (Attack) → Deal Damage → Change Status
| Node | Field | Value |
|---|---|---|
| Leaf Intent | Intent | Attack |
| Deal Damage | Target | Opponent |
| Amount | 3 | |
| Ignore Armor | Disabled | |
| Change Status | Target | Opponent |
| Amount | 1 | |
| Mode | Delta | |
| Status | Embermark |
At battle start, this path resolves Leaf Intent and extracts the value 3 from the following Deal Damage node for the Attack preview in Full mode. When the enemy turn begins, GCS executes the planned leaf path, deals 3 damage to Trial Hero, and applies 1 stack of Embermark.
The presentation chain follows the same organization established for the card. Only the enemy hit effect, sound, and floating-text value change.
Play VFX → Play SFX → Show Floating Text
| Node | Field | Value |
|---|---|---|
| Play VFX | Target | Opponent |
| Anchor | On Unit | |
| Prefab | VFX_ImpactHit | |
| Lifetime | 0, automatic | |
| Play SFX | Clip | Hit002 |
| Volume | 1 | |
| Show Floating Text | Target | Opponent |
| Content | Amount | |
| Amount | Switch to an input port and connect Deal Damage → Dealt | |
| Include Sign | Enabled | |
| Custom Color | Disabled | |
| Scale | 1 | |
| Duration | 1 | |
| Offset | (0, 0, 0) |
After connecting Deal Damage → Dealt to the floating-text Amount, leave the three presentation nodes ungrouped for now. Close the FlowGraph window, reopen it through Edit FlowGraph on Trial Dummy, then group the three presentation nodes as Play Effect.
Double-click to enter the group and expose Prefab, Clip, Scale, and Duration. The Dealt connection becomes the Amount boundary port automatically. Leave Include Sign and Custom Color configured inside the group. Return to the parent graph and connect the flow output of Change Status to the group. The floating text now uses the actual damage value.
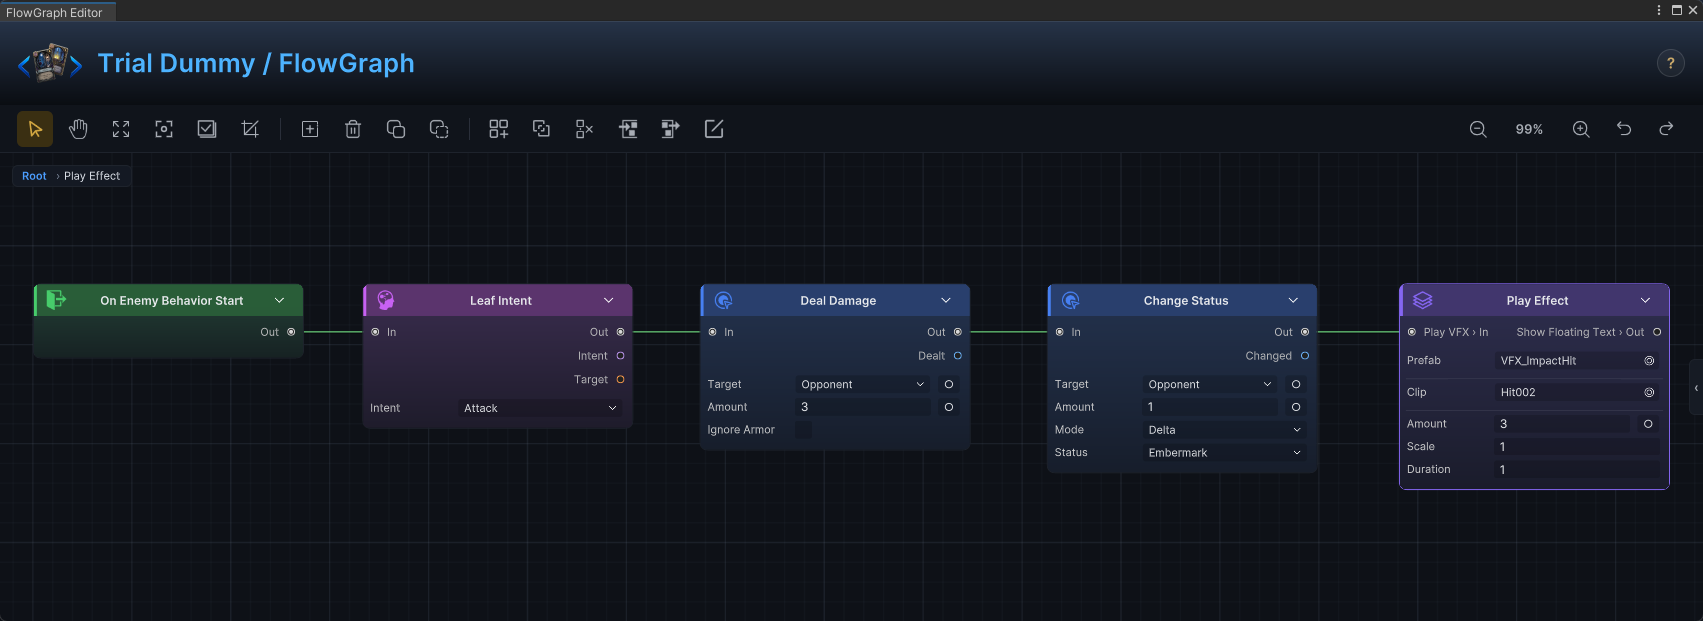
Leaf Intent and the following damage, status, and presentation nodes now share one path. Trial Hero and Trial Dummy also have the deck, attributes, and behavior required for battle startup. See Enemy authoring and Common enemy patterns for more combinations of enemy intents and behavior graphs. With both sides ready, Encounter can assemble the complete battle.
4. Assemble the battle in an Encounter
Switch to Encounter, click the + above the list to create Ember Trial, then place the completed player, enemy, and deck in Player, Enemy Units, and Reward Deck. Configure the opening hand, draw, energy, and turn rules.
| Section | Field | Value |
|---|---|---|
| Basic | Name | Ember Trial |
| Description | A complete second-battle tutorial encounter. | |
| Difficulty | Normal | |
| Tags | Leave empty | |
| Visual | Icon | Background, shown as the battle background in the initialized scene |
| Player | Player | Trial Hero |
| Enemy Units | Enemy Units | Trial Dummy × 1 |
| Reward Deck | Reward Deck | Ember Trial Deck |
| Battle Rules | Starting Hand Size | 5 |
| Draw Per Turn | 5 | |
| Max Hand Size | 10 | |
| Starting Energy | 0 | |
| Card Reward Count | 3 | |
| Armor Decay | ResetOnTurnStart | |
| Hand Discard | DiscardOnTurnEnd | |
| Enemy Intent Display | Full | |
| Animation Gap | 0.28 seconds |
Four of these rules can be misunderstood from their field names:
-
Starting Energy = 0means that the Encounter does not override the player's base energy. The runtime falls back toBase Energy = 3fromTrial Hero, so the Play Mode opening still shows3/3. -
Fullkeeps both the intent icon and any calculable value, so this enemy behavior shows Attack with a value of3.IconOnlyhides the value, whileHiddenhides the intent display. -
Card Reward Count = 3is the maximum number of candidates.Ember Trial Deckhas only one unique entry,Ember Strike × 10, and reward draws do not select the same entry more than once. Victory in this battle can therefore produce at most one card candidate. -
Animation Gapis saved with the Encounter, but the current runtime does not read this field.0.28therefore does not change the interval between node execution or phase progression.
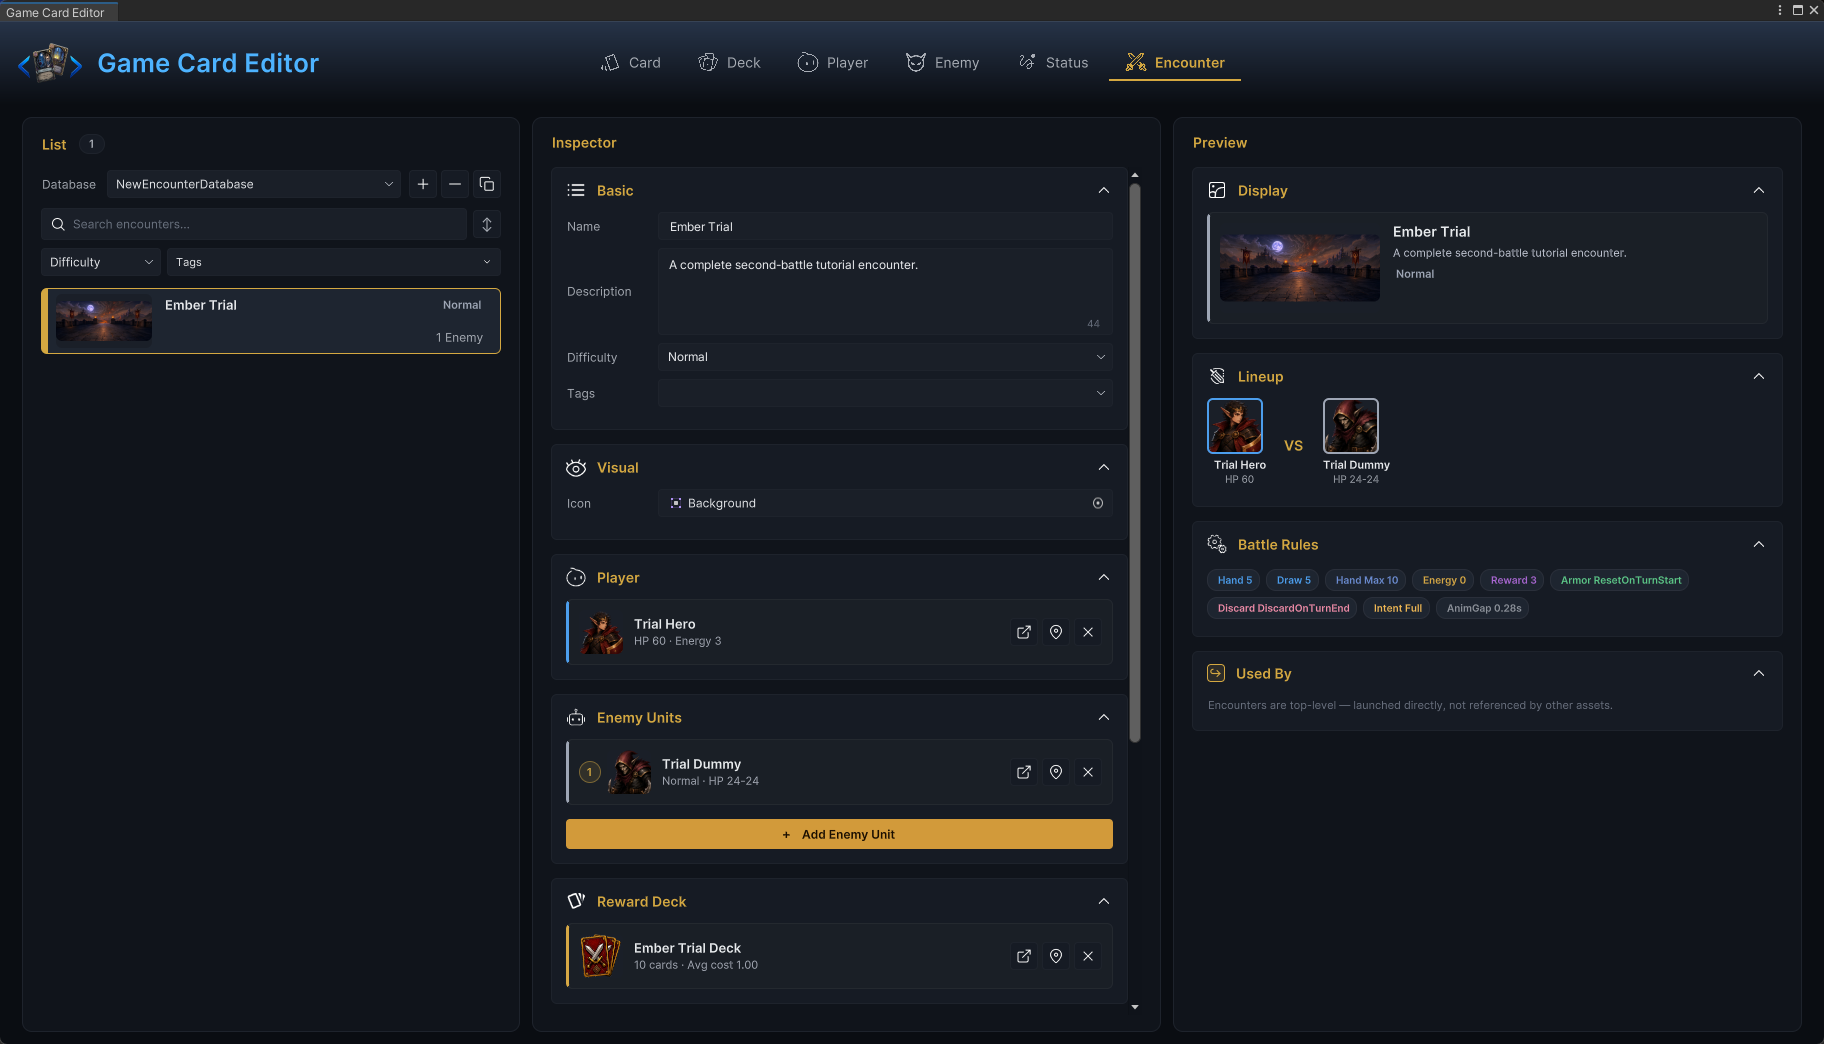
Lineup now shows Trial Hero against Trial Dummy. The Battle Rules summary also shows Hand 5, Draw 5, Hand Max 10, Energy 0, Reward 3, and Intent Full. With both sides, the reward source, and the battle rules complete, select GameCardManager, assign Ember Trial under Encounter Bootstrap, and enable Auto Start On Play.
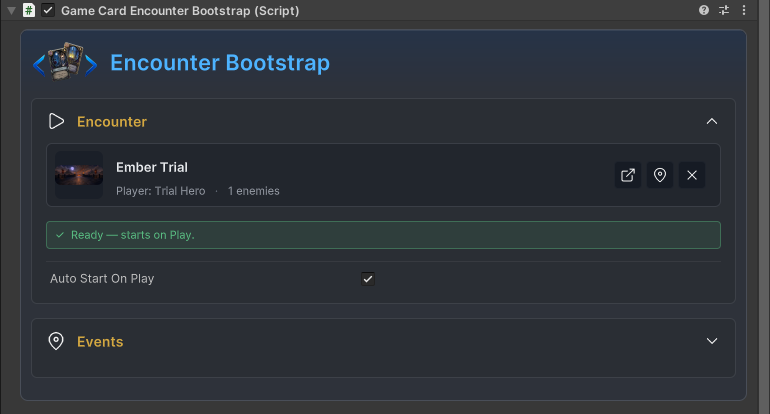
The green Ready — starts on Play status means that Ember Trial belongs to the active Encounter Database and that Auto Start On Play is enabled. When you enter Play Mode, Bootstrap passes this Encounter to GameCardManager for startup. See Encounter authoring for encounter lineups, rules, and reward boundaries. See Starting a battle for automatic scene startup and code-driven entry points.
5. Verify the complete battle in Play Mode
Enter Play Mode. The opening board should match the player, enemy, deck, energy rules, and intent display configured above. Trial Hero should be at 60/60, Trial Dummy at 24/24, and energy at 3/3; the same board should also show 5 Ember Strike cards in hand, 5 cards in the draw pile, 0 cards in the discard pile, and an Attack with a value of 3 above the enemy.
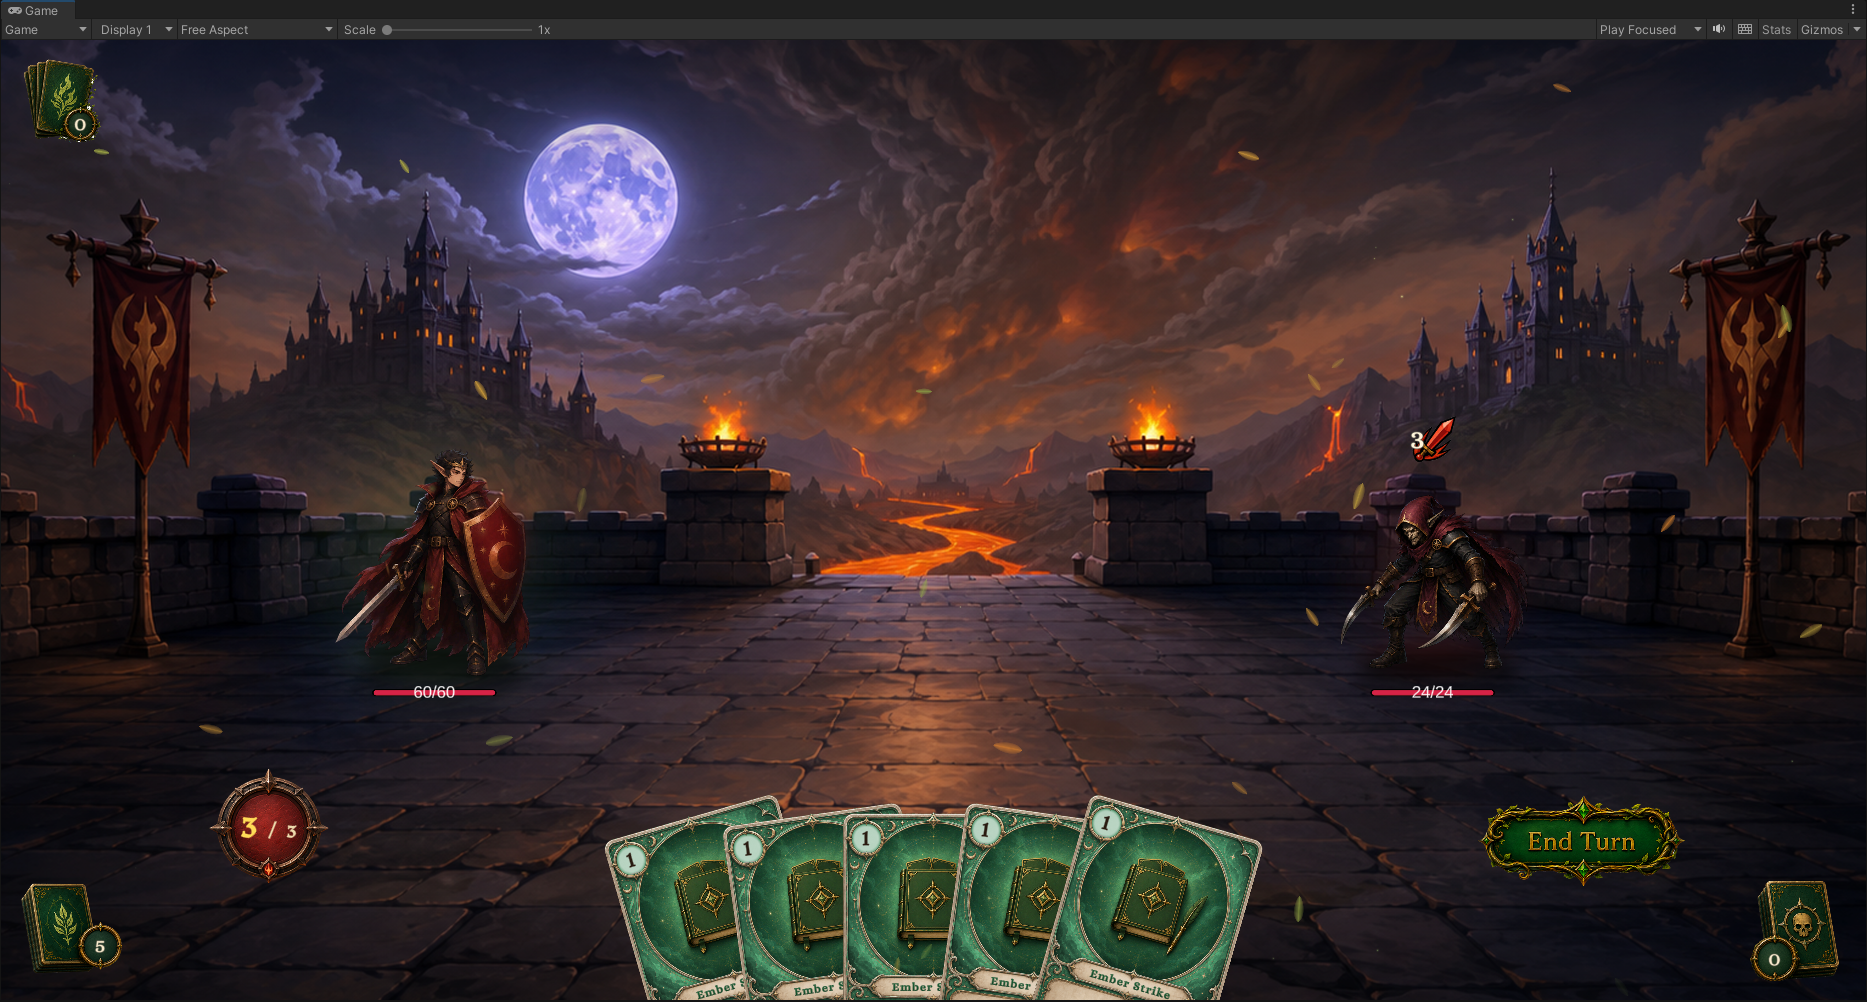
The five identical cards come from the ten copies of Ember Strike. Attack 3 comes from the resolved Leaf Intent → Deal Damage path on the enemy. Once these opening results are present, click an Ember Strike. The card's Single Enemy target mode enters enemy selection, darkens the battlefield, points a red arrow at Trial Dummy, and displays white corner markers around the target:
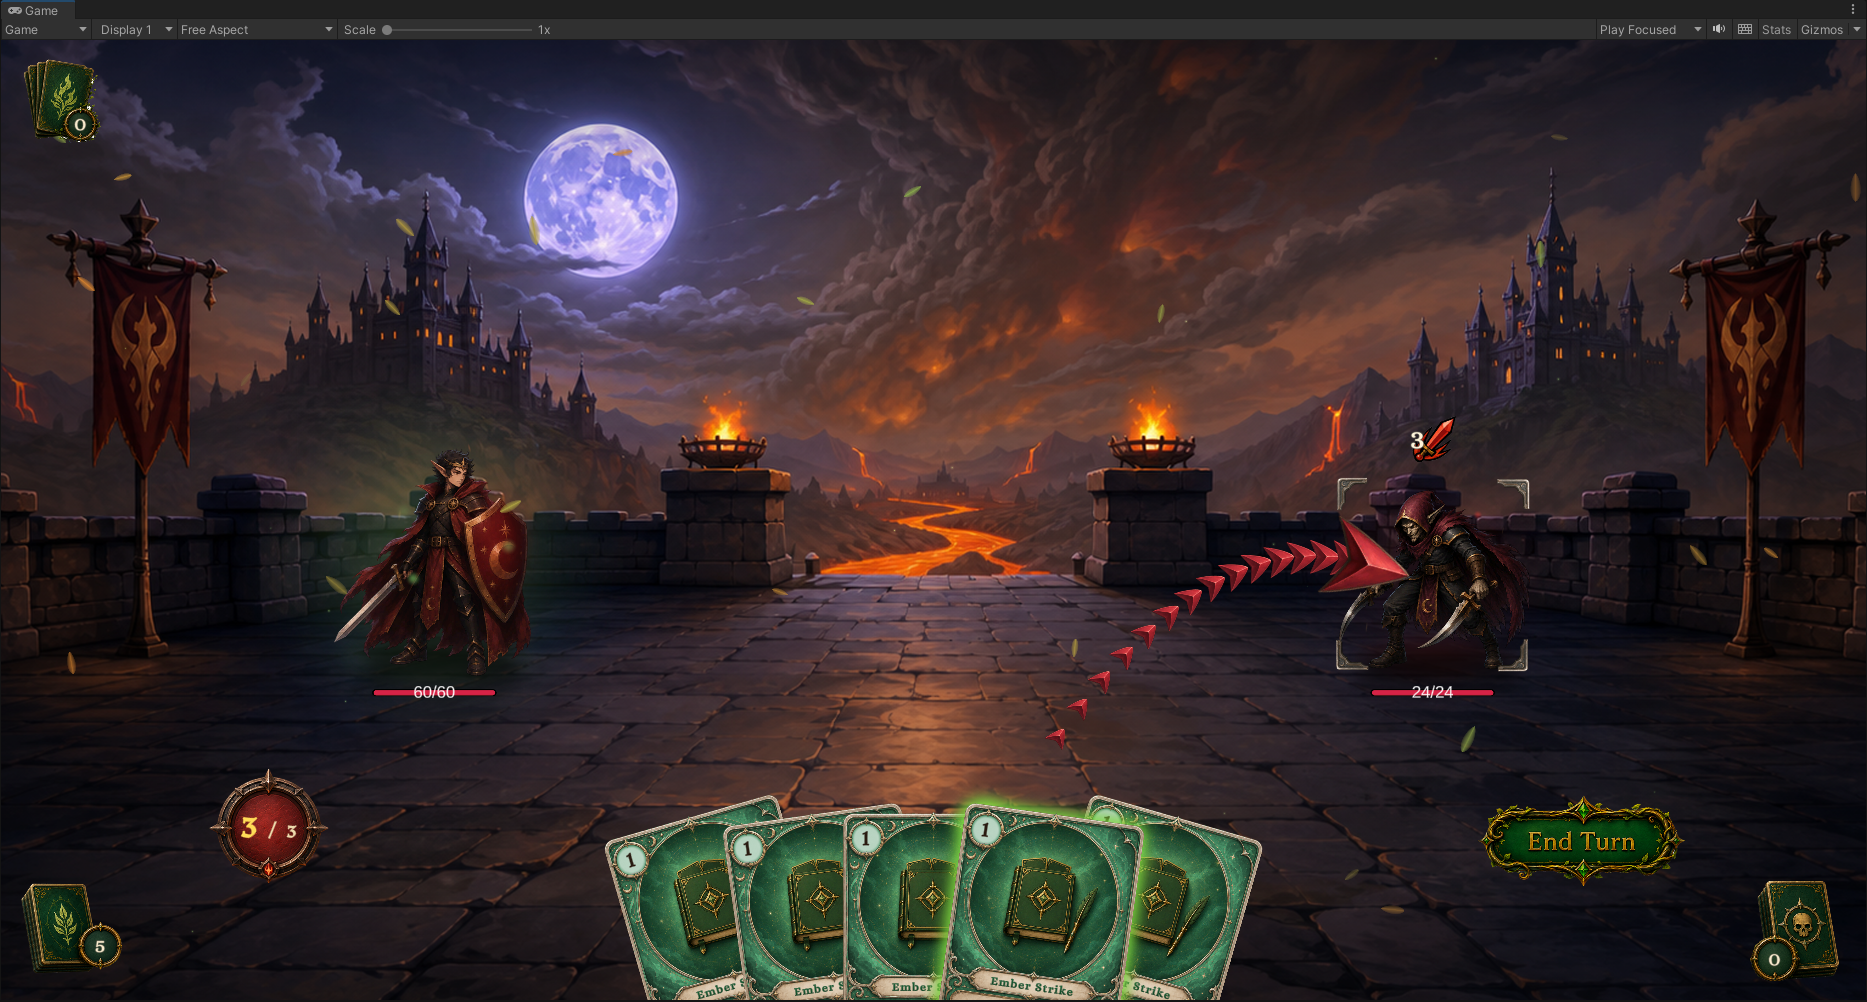
When the overlay, arrow, and markers appear, click Trial Dummy to confirm the target. On Card Played follows the damage, status, and presentation group to complete the card path.
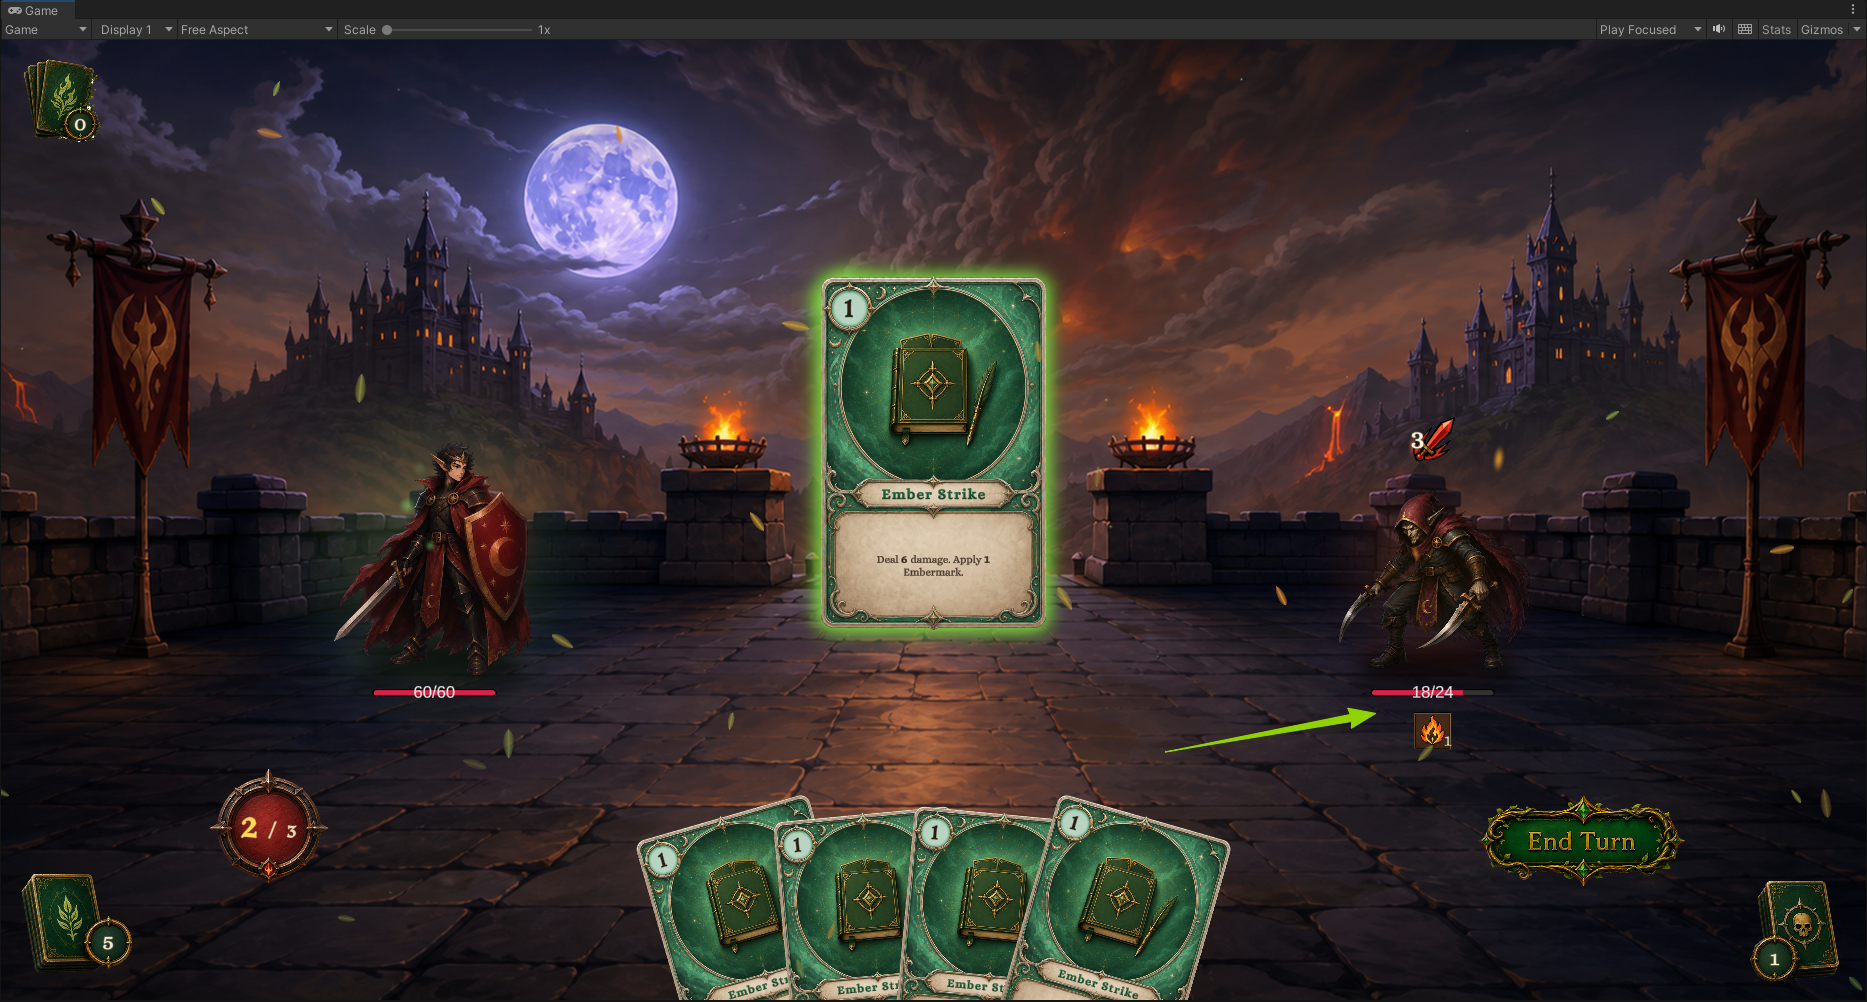
After resolution, energy drops from 3 to 2, the hand from 5 cards to 4, the discard pile from 0 to 1, and enemy HP from 24 to 18. The status bar shows 1 stack of Embermark. Cost, target, damage, status, and pile movement should all take effect in the same card play.
Click End Turn. DiscardOnTurnEnd moves the remaining 4 cards into the discard pile. Trial Dummy then executes Attack 3, deals 3 damage to the player, and applies 1 stack of Embermark. When the action finishes, the system resolves the next Attack 3, enters the second player turn, refills 3 energy, and draws the remaining 5 cards.
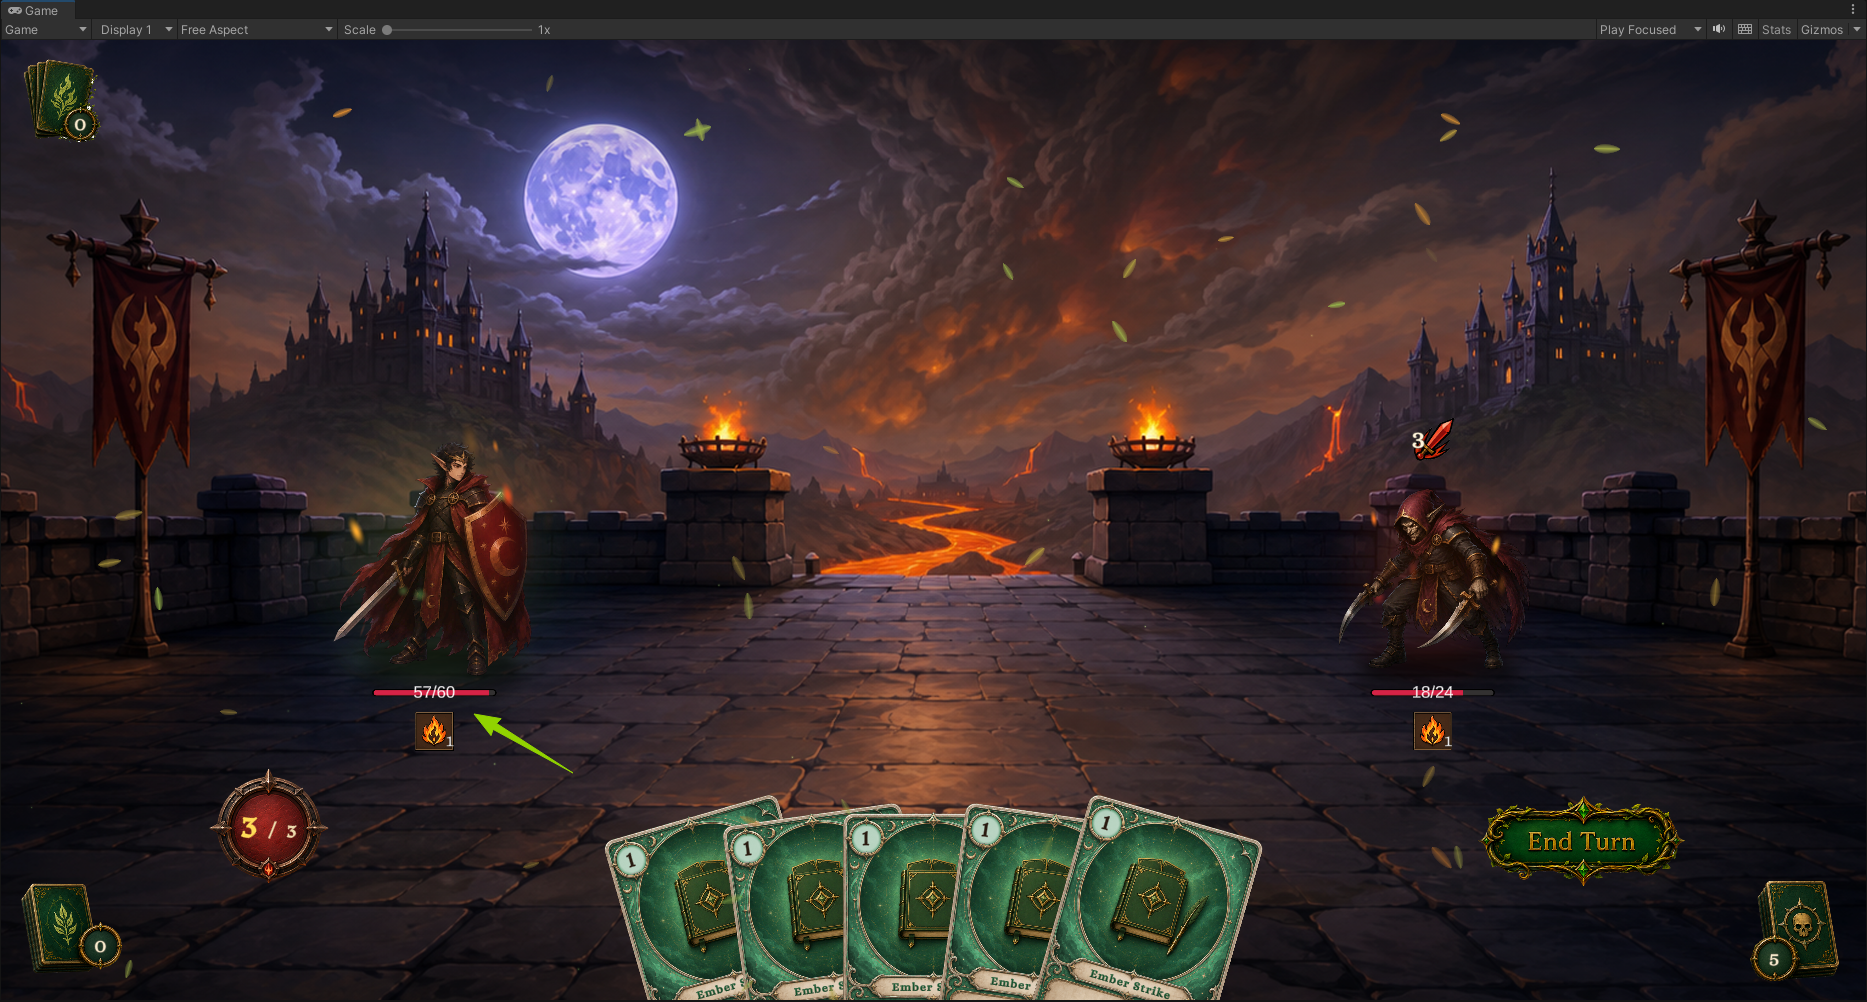
At the start of the second player turn, Trial Hero is at 57/60 with 1 stack of Embermark, matching the damage and status path the enemy just executed. Energy is back to 3/3, while the hand, draw pile, and discard pile contain 5, 0, and 5 cards. The earlier Embermark on the enemy also remains at 1 stack, exactly as defined by Decay Rule = Never and an empty Behavior.
Check the Console one last time. If it contains no GCS errors, database activation, content references, both FlowGraphs, Encounter assembly, and Bootstrap startup have all passed verification.
Each stage now has a visible result. You have completed the first full battle scene of your own.
See Battle loop for the complete order of drawing, discarding, the enemy phase, and the next turn.