Zero-Code Event Configuration: The Complete Game Event Behavior Guide
It's 3 PM on a Tuesday. Your designer leans over and says, "Hey, can we make the screen shake a little stronger when the player gets hit for more than 50 damage? And add a half-second delay before the hit sound plays? Oh, and the poison effect should tick every 1.5 seconds instead of 2."
Three changes. Maybe fifteen seconds of actual decision-making from the designer's perspective. But here's what actually happens: you close the Scene view. Open your IDE. Wait for it to load. Search for the damage handler. Find the screen shake intensity value buried in a method. Change it. Then find the audio delay -- that's in a different class. Change it. Then find the poison coroutine -- that's in yet another class, and the tick rate is part of a WaitForSeconds call. Change it. Save all three files. Switch back to Unity. Wait for recompilation. Test.
Eight minutes later, the designer says "actually, the shake was better before, and can we try the poison at 1.8 seconds?"
This is the loop that kills iteration speed in game development. Not the big architectural decisions -- the constant, grinding friction of needing a programmer to touch code for every parameter tweak. It's not just slow. It's a collaboration bottleneck that fundamentally limits how fast your team can iterate on game feel.
And the worst part? The programmer isn't doing programming during this loop. They're doing data entry. Changing a 0.5f to a 0.3f and waiting for the compiler. That's not a good use of anyone's time.
The Designer-Programmer Handoff Problem
Let's be honest about how most Unity teams work. There are two types of people who need to touch event responses: the people who build the systems (programmers) and the people who tune the parameters (designers). These are fundamentally different activities that require fundamentally different tools.
Programmers need IDEs, debuggers, version control, and the full power of C#. Designers need sliders, dropdowns, checkboxes, and immediate feedback. When you force both groups through the same code-compile-test pipeline, you're optimizing for neither.
The Classic Dependency Loop
Here's the pattern that plays out on every team I've worked with:
- Designer has an idea: "What if we added a 0.2 second delay before the hit reaction?"
- Designer can't make the change -- it's in code
- Designer asks programmer
- Programmer is in the middle of something else -- context switch penalty
- Programmer opens the file, makes the change, waits for compile
- Designer tests it: "Hmm, try 0.15"
- Repeat steps 4-6 until it feels right
- Total elapsed time: 20 minutes for what's conceptually a 5-second tweak
Multiply this by every parameter in every event response across your entire project. Multiply again by every day of production. The cumulative cost is staggering, and most teams just accept it as normal because they've never experienced anything else.
What Designers Actually Want to Control
When you break it down, what designers need to adjust about event responses falls into a few clear categories:
What happens. When an event fires, which methods get called? Play a sound, spawn a particle effect, update a UI element, trigger an animation.
Under what conditions. Should this response fire every time, or only when the damage exceeds a threshold? Only when the player is below 30% health? Only when a specific flag is true?
With what timing. Should the response be immediate, or delayed by 0.2 seconds? Should it repeat? How often? How many times?
None of these are "programming" questions. They're design questions. A designer should be able to answer them without writing a line of code.
The Traditional Solutions (And Why They're Insufficient)
Unity developers have tried various approaches to give designers more control. Each has significant limitations.
Expose [SerializeField] fields on MonoBehaviours. This works for simple values, but it gets messy fast. Every tuneable parameter needs its own serialized field. The Inspector becomes a wall of unlabeled floats. There's no grouping, no conditions, no timing control. And the programmer still has to anticipate every parameter the designer might want to tweak -- miss one and it's back to the code-compile loop.
// The "expose everything" approach
public class DamageResponse : MonoBehaviour
{
    [SerializeField] private float screenShakeIntensity = 0.5f;
    [SerializeField] private float screenShakeDuration = 0.3f;
    [SerializeField] private float soundDelay = 0.1f;
    [SerializeField] private float damageThreshold = 50f;
    [SerializeField] private bool enableScreenShake = true;
    [SerializeField] private bool enableSound = true;
    [SerializeField] private float poisonTickRate = 2.0f;
    [SerializeField] private int poisonTickCount = 5;
    // ... this grows forever
    // And it's all tangled with the implementation code
}
Custom Editor scripts. You can build beautiful custom Inspectors for each system. But that's a significant engineering investment per system. And every time the underlying system changes, the custom editor needs to change too. Most teams can't afford this for every event response in the game.
UnityEvent. Unity's built-in UnityEvent system is the closest thing to a real solution. Drag a target object, pick a method from a dropdown, done. Designers can wire up responses without code. But UnityEvent has real limitations:
- No condition system -- you can't say "only fire if value > 50"
- No scheduling -- no delays, no repeats, no timing control
- String-based method binding -- fragile under refactoring
- Limited generic type support -- doesn't handle typed event parameters cleanly
- No status visibility -- you can't tell at a glance which events have responses configured
UnityEvent gets you maybe 40% of the way there. The remaining 60% -- conditions, scheduling, type safety, status visibility -- is the hard part.
The Real Question
Can you give designers complete control over event responses -- including conditions, timing, and repetition -- without building a custom editor for every single event in your project?
That's the question the GES Behavior Window answers.
The Behavior Window: Full Response Control, Zero Code
The Behavior Window is a single editor interface that lets anyone -- designer, audio engineer, gameplay programmer -- configure complete event responses through visual controls. No IDE. No compilation. No waiting.
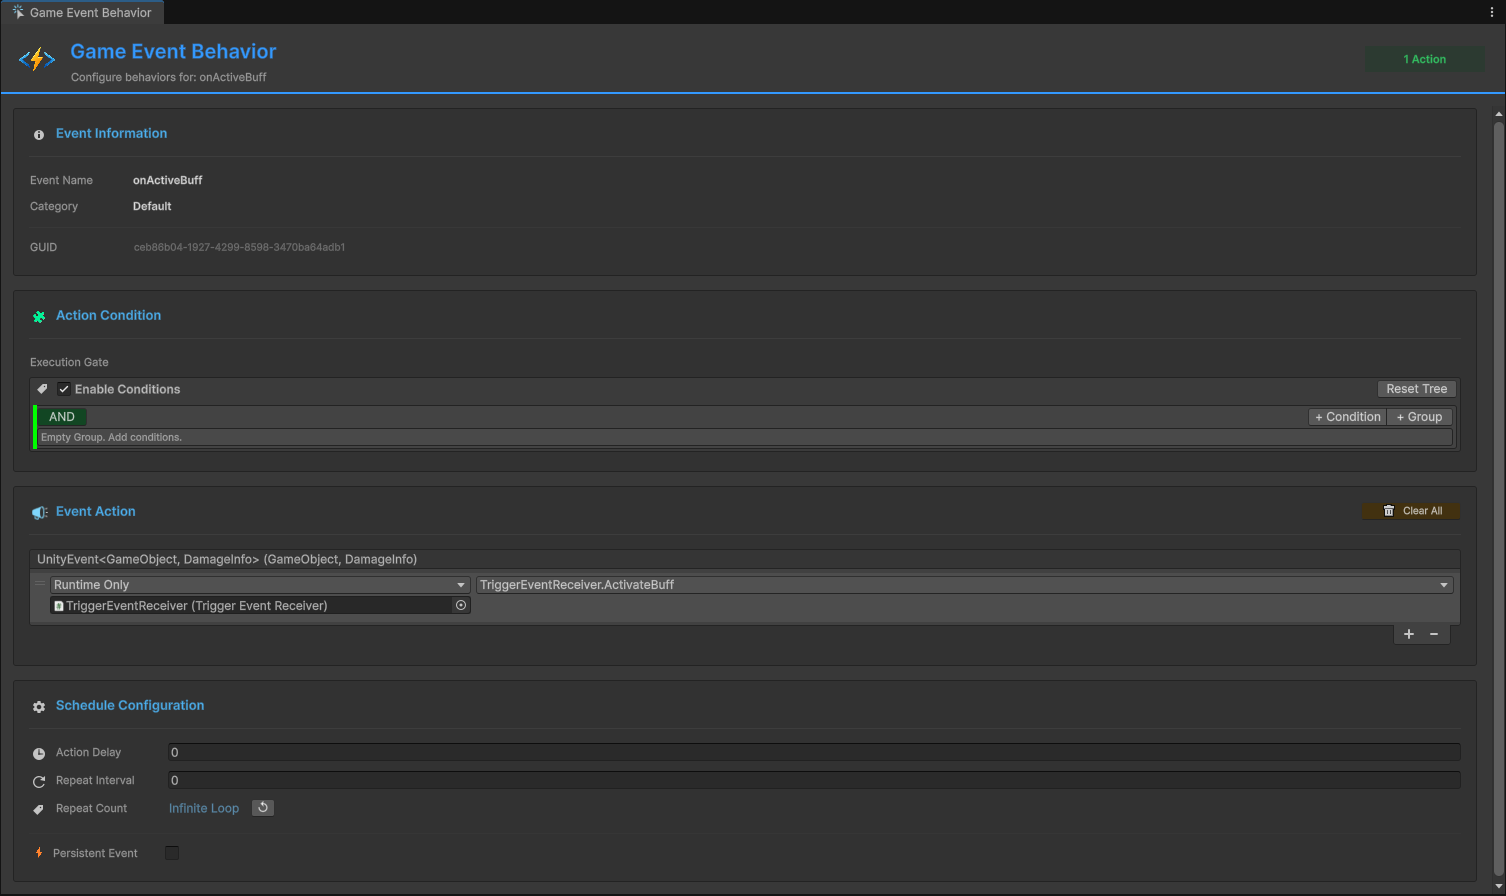
It's divided into four sections that flow in a logical order: "What event is this?" > "Should it respond?" > "What does it do?" > "When and how often?"
Receivers are configured directly in this window. There's no separate "listener" component to add to GameObjects. You select an event, open the Behavior Window, and configure everything in one place.
Event Info: Your "You Are Here" Marker
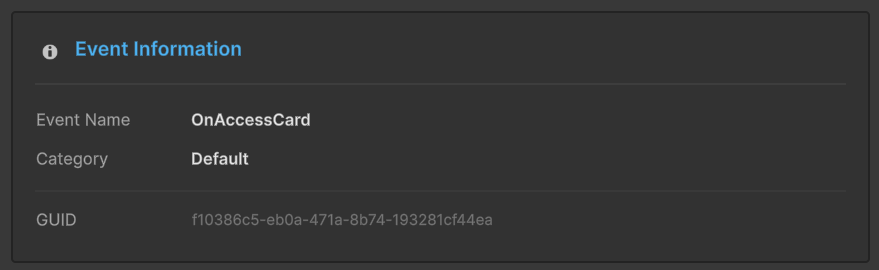
The top section is read-only -- it displays the identity of the event you're configuring: name, type (parameterless, single parameter with type, or sender), GUID, category, and database.
This seems trivial until you've been configuring behaviors for twelve events in a row and you lose track of which one you're looking at. The info section is your confirmation. And the GUID is genuinely useful for debugging -- when you see an event ID in a console log at runtime, you can match it here instantly.
Action Condition: The "If" Before the "Then"
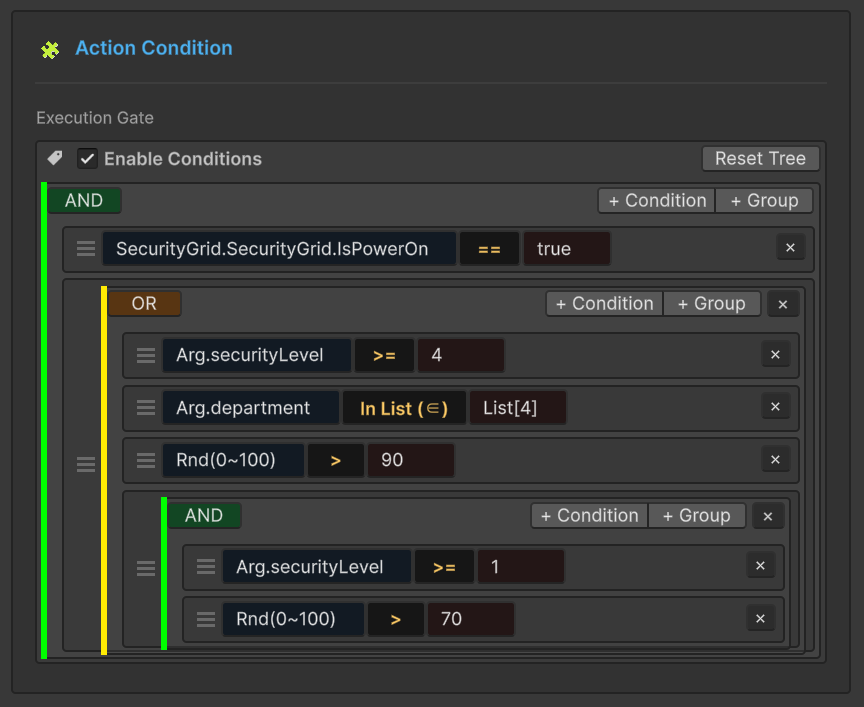
This is where the Behavior Window goes beyond what UnityEvent can do. The Action Condition section is a visual gate that determines whether the response should actually fire when the event is raised.
You build condition trees in the Inspector:
- Value comparisons -- is the incoming parameter greater than, less than, or equal to a threshold?
- Boolean states -- is a flag true or false?
- Reference checks -- is a specific object null or not null?
- Compound conditions -- AND/OR combinations of the above
Here's where the designer-programmer collaboration truly clicks. The programmer creates a Float32GameEvent called OnDamageReceived and writes the code that raises it:
[GameEventDropdown, SerializeField] private Float32GameEvent onDamageReceived;

// Somewhere in the damage calculation:
onDamageReceived.Raise(calculatedDamage);
The programmer's job is done. Now the designer opens the Behavior Window and configures a condition: "only respond if the damage value is greater than 50." The designer can change that threshold to 30, to 80, to 1000, and test each one immediately in Play mode. No code changes. No recompilation. No waiting for the programmer to be free.
Conditions are optional. If you don't configure any, the response fires every time the event is raised. For many use cases, that's exactly right -- not every response needs a gate.
The condition tree system also handles the more complex scenarios that would traditionally require custom code. "Respond only if damage is greater than 30 AND the player is in combat mode" becomes two nodes in a condition tree. No if statements to write, no booleans to expose.
Event Action: What Actually Happens
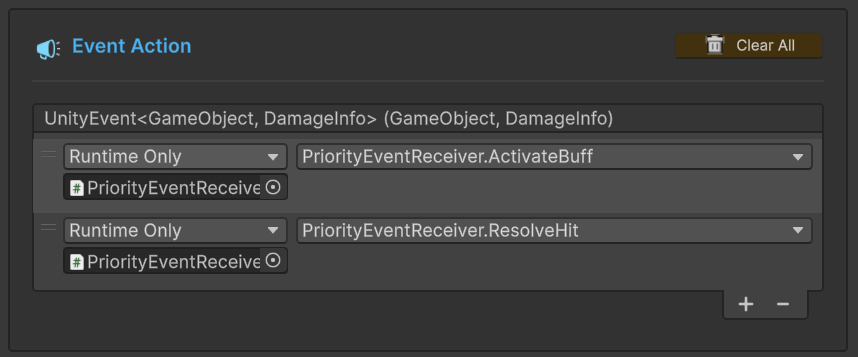
The Event Action section defines what happens when the event fires and conditions pass. If you've used a Button's onClick in Unity's Inspector, you know the basic pattern: drag in a target object, select a method from the dropdown. The Behavior Window uses the same pattern, extended to support GES's type system.
For parameterless events, you get a standard action binding. Drag a target, pick a method that takes no parameters:
// These methods can be bound from the Behavior Window:
public void PlayExplosionEffect() { /* ... */ }
public void ShakeCamera() { /* ... */ }
public void IncrementKillCounter() { /* ... */ }
For typed events, the incoming event data is automatically passed to the bound method. The Behavior Window understands your event's parameter type and only shows compatible methods:
// For a Float32GameEvent (OnDamageReceived):
public void ApplyDamage(float amount)
{
    currentHealth -= amount;
    UpdateHealthBar();
}

// For a StringGameEvent (OnDialogueTriggered):
public void ShowDialogue(string text)
{
    dialogueBox.SetText(text);
    dialogueBox.Show();
}
For sender events, you get both the data and the source GameObject:
// For a sender Float32GameEvent (OnDamageDealt):
public void HandleDamage(float amount, GameObject source)
{
    currentHealth -= amount;
    FaceToward(source.transform);
    SpawnHitParticles(source.transform.position);
}
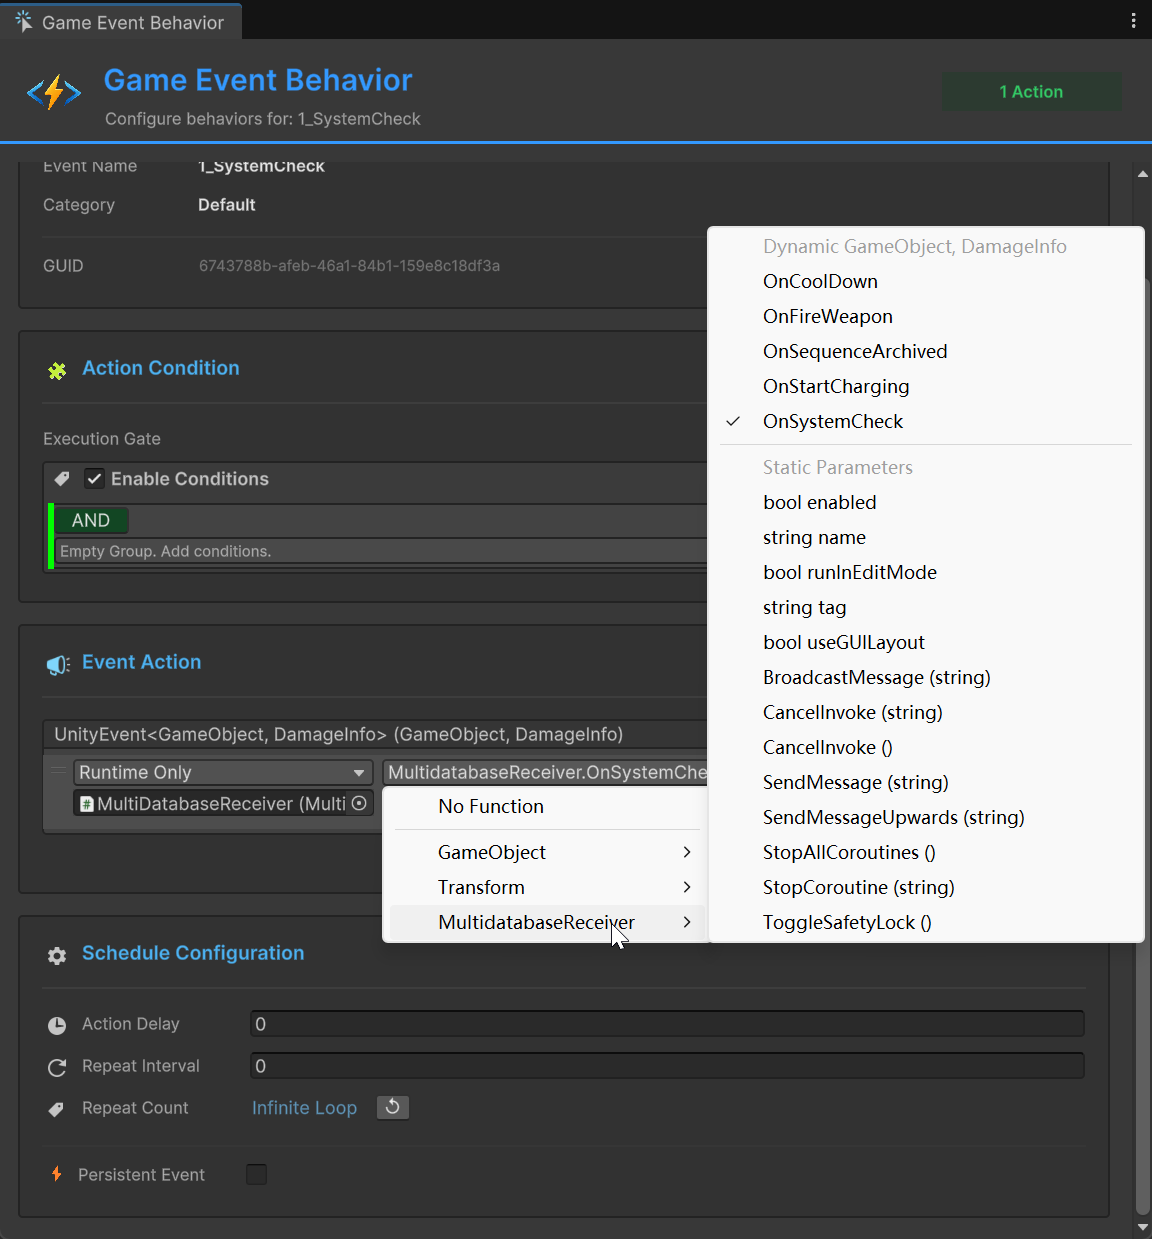
The action binding supports Dynamic and Static parameter modes. Dynamic mode passes the event's runtime value to the method -- the actual damage amount that was raised. Static mode lets the designer set a fixed value in the Inspector, ignoring the event data. Both modes are useful: dynamic for "apply the actual damage," static for "always play the loud explosion sound regardless of damage amount."
You can bind multiple actions to a single behavior. When the event fires and conditions pass, all bound actions execute in order. This is the pattern I use constantly: bind one event to methods on three different objects. The event fires once, but the audio manager plays a sound, the VFX manager spawns particles, and the UI manager shows a notification. Three systems respond independently, completely decoupled from each other.
Schedule: Timing Without Coroutines
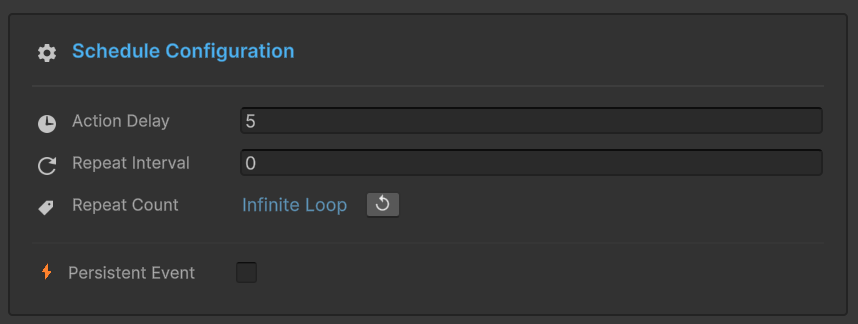
The Schedule section is where the Behavior Window goes from "useful" to "I can't believe this doesn't require code." This is full timing and lifecycle control, all from visual fields.
Action Delay -- time in seconds between when the event fires and when the action executes. Zero for immediate. 0.5 for half a second. 3.0 for three seconds.
This alone is worth the price of admission. Consider an explosion event:
Event: OnExplosion
  Behavior 1: ShakeCamera()      -- Delay: 0.0s
  Behavior 2: PlayExplosionSFX() -- Delay: 0.05s
  Behavior 3: ShowDamageNumber() -- Delay: 0.3s
  Behavior 4: FadeSmoke()        -- Delay: 1.5s
No coroutines. No Invoke calls. No timer management code. The designer sets four delay values and gets a perfectly sequenced explosion response. Change the sound delay from 0.05 to 0.1 to simulate farther distance? One field. Test immediately.
Repeat Interval -- time between repeated executions. Set it to 1.0 and the action repeats every second.
Repeat Count -- how many times the action repeats:
- 0 -- execute once, no repeating (the default)
- N -- execute N additional times after the first
- -1 -- repeat infinitely until cancelled or the object is destroyed
Combine these and you get looping behaviors without a single line of code:
Event: OnPoisoned
Action: ApplyPoisonTick(5.0f)
  Delay: 0.0s
  Repeat Interval: 2.0s
  Repeat Count: 5
  Result: 5 damage immediately, then every 2 seconds, 5 more times
  Total: 6 ticks x 5 damage = 30 poison damage over 10 seconds
Want to change the poison to 3 damage every 1.5 seconds for 8 ticks? Change three numbers. Test immediately. The designer just tuned a damage-over-time system without the programmer even knowing about it.
Persistent Event -- makes the behavior survive scene loads when the object uses DontDestroyOnLoad. Essential for global systems like audio managers, analytics trackers, and achievement systems that need to respond to events regardless of which scene is active.
Color-Coded Status: See Your Architecture at a Glance
One of my favorite details in the GES ecosystem is the color-coded behavior status visible throughout the toolchain:
- Green -- this event has behaviors configured in the Behavior Window. Responses are set up and ready.
- Blue -- this event has listeners registered at runtime through code. Behaviors exist, but they were wired programmatically.
- Orange -- this event has no configured behaviors. Either it's unused, or someone forgot to set up responses.
A sea of orange in your Event Editor means you have events that nobody is listening to. Either they're dead code that should be cleaned up, or they're missing responses that should be configured. Either way, you know about it at a glance instead of discovering it when a player reports a bug.
The Workflow Transformation
Let's bring this back to the scenario from the beginning. Your designer wants three changes: stronger screen shake for big hits, a half-second delay on the hit sound, and a different poison tick rate.
Old workflow: Designer asks programmer. Programmer context-switches. Three files, three changes, one compilation, one test, one "actually, try different values," another compilation. Twenty minutes.
New workflow: Designer opens the Behavior Window. Changes the screen shake condition threshold. Changes the sound delay field. Changes the poison repeat interval. Tests in Play mode. Adjusts. Tests again. Done. Three minutes. The programmer never left their own task.
The programmers define the architecture and build the systems that expose public methods. Then they write the Raise() call:
[GameEventDropdown, SerializeField] private Float32GameEvent onDamageReceived;

public void TakeDamage(float amount)
{
    // Programmer's responsibility: raise the event with data
    onDamageReceived.Raise(amount);

    // Everything that RESPONDS to this event is configured
    // in the Behavior Window by the designer.
    // The programmer doesn't need to know or care what those responses are.
}
That's the clean separation. Programmers own the "what events exist and when they fire." Designers own the "what happens in response and with what timing." Neither blocks the other.
Practical Example: A Complete Damage Response System
Let's put it all together. We want the following responses when a player takes damage:
- Flash the screen red immediately
- Play a hurt sound after a tiny delay
- Show a floating damage number
- Camera shake, but only for big hits (over 50 damage)
- A bleed effect that ticks 3 times over 6 seconds
Behavior 1: Screen Flash
- Condition: none (always fire)
- Action:
ScreenEffects.FlashRed() - Delay: 0.0s, Repeat: 0
Behavior 2: Hurt Sound
- Condition: none
- Action:
AudioManager.PlayHurtSound() - Delay: 0.03s, Repeat: 0
Behavior 3: Damage Number
- Condition: none
- Action:
DamageUI.ShowNumber(float)-- receives the damage value dynamically - Delay: 0.1s, Repeat: 0
Behavior 4: Camera Shake
- Condition: value > 50.0
- Action:
CameraController.HeavyShake() - Delay: 0.0s, Repeat: 0
Behavior 5: Bleed Effect
- Condition: none
- Action:
PlayerHealth.ApplyBleedTick(float) - Delay: 1.0s, Repeat Interval: 2.0s, Repeat Count: 3
All configured in the Behavior Window. The designer can:
- Change the camera shake threshold from 50 to 30 by editing one field
- Adjust the bleed timing from 2-second intervals to 1.5
- Disable the screen flash entirely by removing that behavior
- Add a new response (controller vibration) by adding another behavior
- Reorder the delays to change the "feel" of getting hit
None of these changes require touching code. None require recompilation. The programmer who built ScreenEffects, AudioManager, CameraController, and PlayerHealth only needed to expose public methods. The Behavior Window handles all the wiring, conditions, and scheduling.
When to Use the Behavior Window vs. Code
The Behavior Window isn't a replacement for code-based event handling. It's a complement. Here's the split that works in practice:
Use the Behavior Window when:
- The response is straightforward (call methods, set values)
- Designers need to iterate on parameters
- You want to experiment with timing quickly
- The response doesn't need complex branching logic
Use code listeners when:
- The response involves complex state machine logic
- You need to process event data before responding
- The response involves async operations or complex coroutine chains
- Performance is critical in a tight loop
Most projects end up with 60-70% of responses configured through the Behavior Window and 30-40% through code. Teams with more designers skew higher on the Behavior Window side. The important thing is that the designer-driven responses never block on programmer availability.
The Bigger Picture
The Behavior Window isn't really about saving time, though it does that. It's about changing who can do what on your team.
In the traditional model, event responses are programmer territory. Every tweak, every experiment, every "what if we tried this" goes through the code-compile pipeline. This creates a bottleneck where the designer's creativity is gated by the programmer's availability.
In the Behavior Window model, programmers build systems and raise events. Designers configure responses and iterate on feel. The handoff is clean, the iteration is fast, and neither role blocks the other. That's not a tooling improvement -- it's a workflow transformation.
If your team is struggling with iteration speed -- if every small gameplay change requires a code commit and a recompilation cycle -- the Behavior Window might be the single most impactful change you can make. Give it a serious try for one week. Let your designers loose on it. Watch what happens to your iteration speed.
In the next post, we'll look at the [GameEventDropdown] attribute -- a single-line addition to your code that gives you a searchable, type-safe, categorized event picker right in the Inspector.
🚀 Global Developer Service Matrix
🇨🇳 China Developer Community
- 🛒 Unity China Asset Store
- 🎥 Bilibili Video Tutorials
- 📘 Technical Documentation
- 💬 QQ Group (1071507578)
🌐 Global Developer Community
📧 Support & Collaboration