Installation and initialization
Import GCS from the Asset Store, check the project environment, then use Initialize System to connect the current scene to the Manager, six database types, Bootstrap, and the battle presentation layer
Import GCS and check the supported environment
GCS supports Unity 2021.3 and later, including Unity 6. The runtime has no third-party dependencies. The included Demo supports the Built-in Render Pipeline and URP. HDRP projects can use the core runtime and Editor tools, but you must adapt the Demo materials and Shaders yourself.
After obtaining GCS from the Unity Asset Store, import it in this order:
- Open Window > Package Manager.
- Change Packages in the upper-left corner to My Assets, then select Game Card System.
- Click Download, then click Import when the download finishes.
- Wait for Unity to finish importing assets and compiling scripts.
For Unity's complete import workflow, see Importing an Asset Store package. After the import finishes, the GCS package is located at:
Assets/TinyGiants/GameCardSystem/
If the Console contains no GCS compilation errors, the package is ready in the project. The next step connects the active scene to the runtime objects, content databases, and startup entry point.
Connect the current scene to GCS
Create or open the scene that will host the battle, save it, and keep it active. Open the GCS dashboard from the Unity menu:
Tools > TinyGiants > GCS > Game Card System
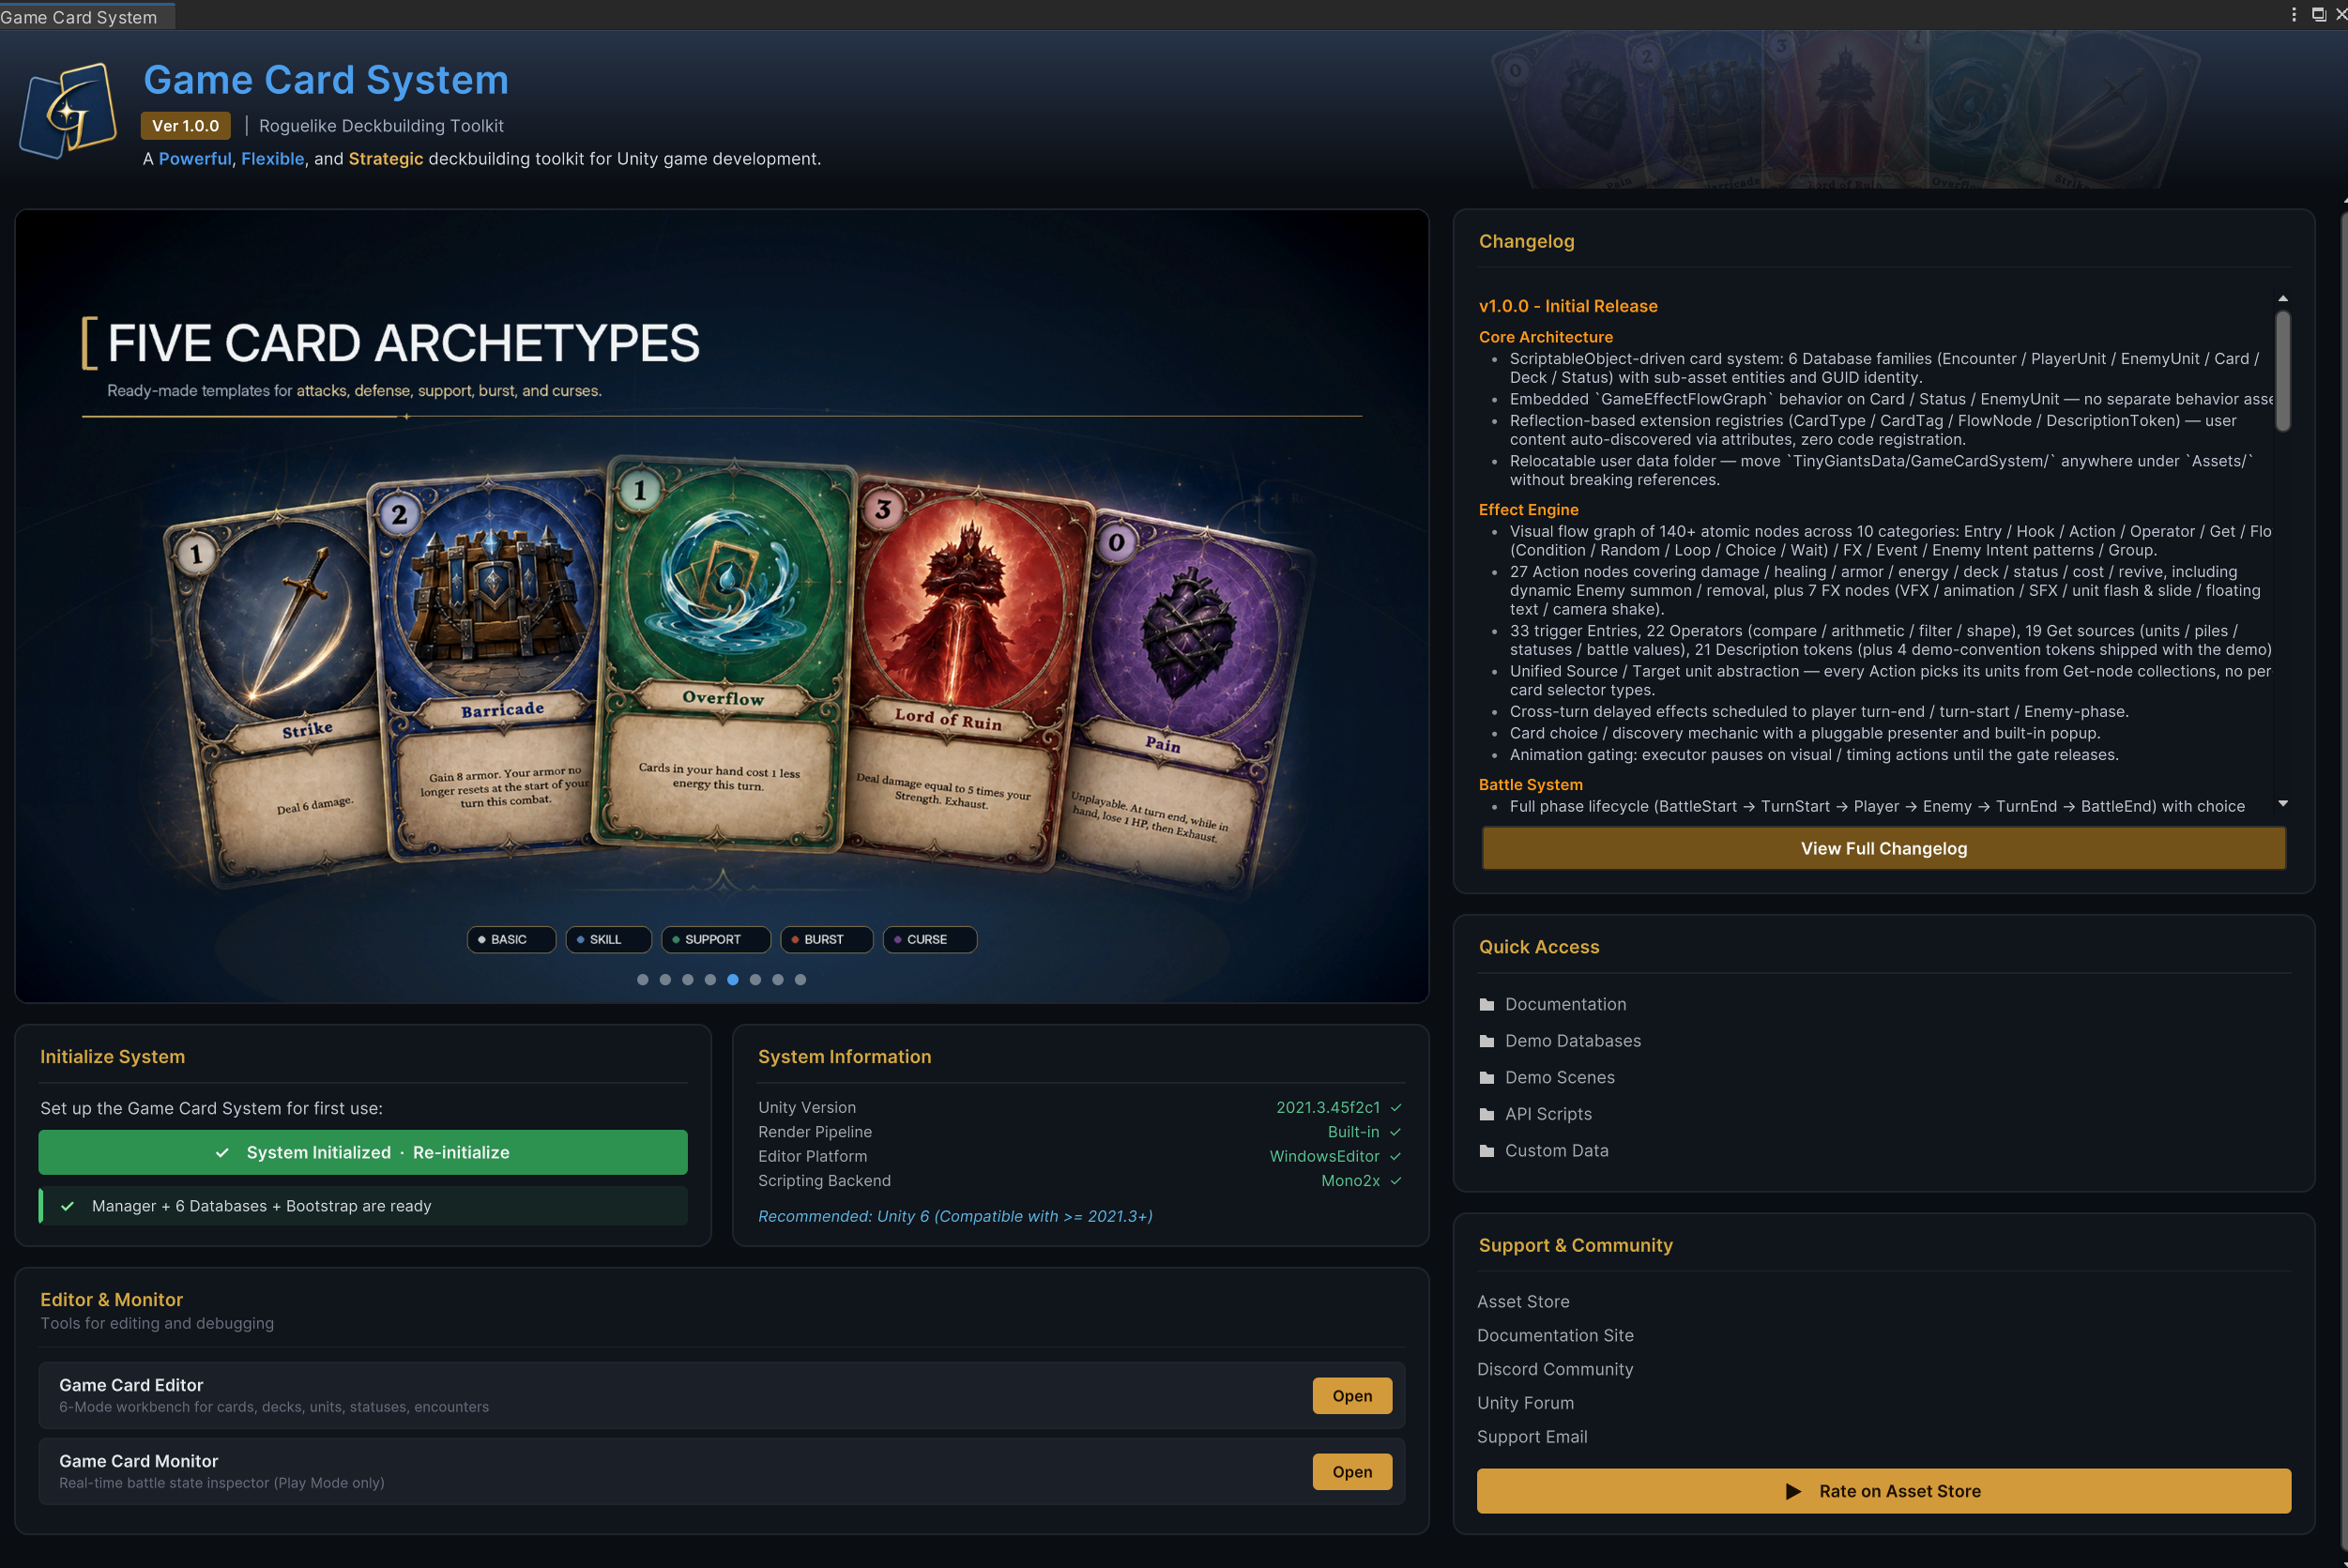
In the dashboard above, System Information checks the project environment, while Initialize System adds the required GCS objects to the active scene. Once initialization passes, the Game Card Editor and Game Card Monitor entries also become available.
Check System Information
System Information reads the current Unity version, render pipeline, Editor platform, and scripting backend. Check here first that the version and render pipeline match your project plan.

The included presentation assets work directly with the Built-in Render Pipeline and URP. If the dashboard detects another render pipeline, prepare compatible materials and Shaders before initializing the scene.
Initialize the scene objects and databases
When the scene has not been connected to GCS, the initialization card displays a yellow Initialize System button.

Click the button. GCS completes four sets of connections around the current active scene:
| Connected content | Initialization result |
|---|---|
| Manager and startup entry point | Creates or reuses GameCardManager, then adds GameCardEncounterBootstrap to the same GameObject |
| Six content database types | Registers the preset Card, Deck, Player Unit, Enemy Unit, Status, and Encounter databases |
| Battle scene root objects | Adds Main Camera, EventSystem, Background, Battle Runtime, and Battle Fx Directors from the scene template |
| Input and background | Adds 2D raycasting to the main camera and connects the preset encounter background resolver |
Once these connections are complete, the button changes to the green System Initialized · Re-initialize state. The status bar also confirms that the Manager, all six database types, and Bootstrap are ready.

The green state means that the scene contains a GameCardManager and that all six database groups have at least one registered database. Use Re-initialize if an object or database is later removed. It reuses the existing Manager, preserves custom databases, and does not turn a manually disabled database back on.
Confirm that all six database types are active
Select GameCardManager in the Hierarchy. Its Inspector lists the Card, Deck, Player Unit, Enemy Unit, Status, and Encounter database groups in that order. In a newly initialized scene, every group should show 1/1 Active.
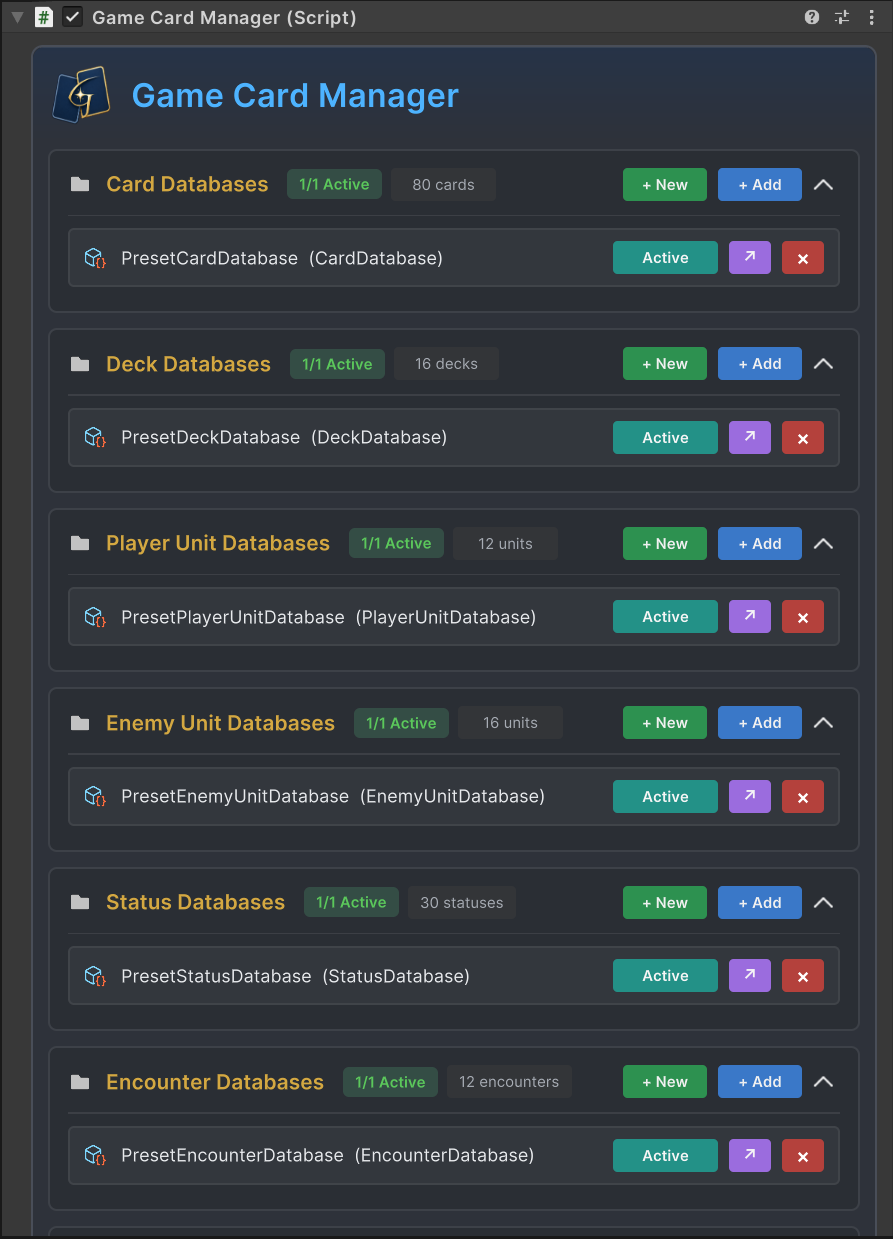
Active databases determine which content the Editor selectors and active content discovery can use. An asset does not enter those sets just because it exists in the project. If a group shows 0/1 Active, enable the corresponding database again. See Database setup for the rules that control adding, ordering, and activating databases.
Select the encounter for the first run
Once all six content types can be discovered, expand GameCardEncounterBootstrap on the same GameObject. Set Default Encounter to the encounter you want to run. For the first check, select Fenmoss Hollow and keep Auto Start On Play enabled.
| Field | Purpose | First check |
|---|---|---|
| Default Encounter | Specifies the player, enemies, rules, and rewards created after entering Play Mode | Select Fenmoss Hollow |
| Auto Start On Play | Controls whether Bootstrap starts the battle automatically when the scene starts | Keep enabled |
| Events | Invokes a UnityEvent after battle startup, or sends a GES event when GES integration is enabled | Keep the defaults |
When the Inspector displays the green Ready — starts on Play status, the content sources, startup entry point, and default encounter are connected.
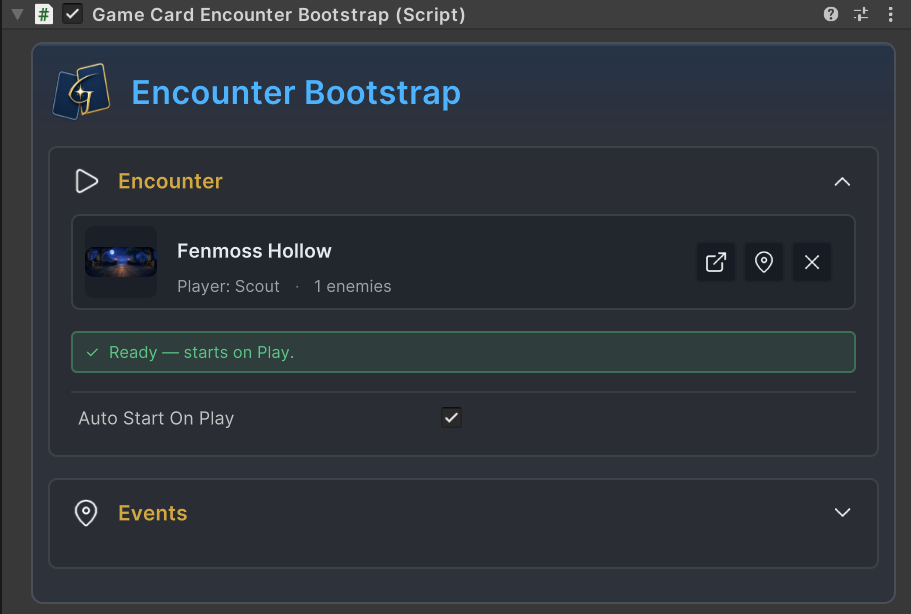
A fixed battle scene can continue to start automatically through Bootstrap. If a map, level, or save flow needs to select the Encounter dynamically, turn off automatic startup and connect the project flow as described in Starting a battle.
Enter Play Mode for the first check
Keep Default Encounter assigned and Auto Start On Play enabled, then enter Play Mode. The following results should appear in order:
GameCardEncounterBootstrapreads Default Encounter.GameCardManagerobtains the player, deck, enemies, rules, and rewards referenced by the encounter.Battle Runtimecreates the player, enemies, hand, energy, intents, and turn state.- The Battle UI displays the board, where the player can select targets, play cards, and end the turn.
At the same time, confirm that the Console contains no GCS errors and that the Hierarchy still contains GameCardManager, Main Camera, EventSystem, Background, Battle Runtime, and Battle Fx Directors. When you return to the GameCardManager Inspector, all six database groups should still be active.
-
If no battle starts, check Default Encounter and Auto Start On Play first.
-
If the battle starts but the hand or units are missing, check whether the corresponding databases are Active.
-
If the cause is still unclear, use Common symptoms to collect evidence from the Console and Monitor.
Once the scene passes these checks, Project structure explains the directory boundary between the included Demo and production content. Database setup covers how to add, order, and activate custom databases.