02 기본 타입 이벤트: 이벤트로 데이터 전달하기
📋 개요
void 이벤트는 간단한 신호에 적합하지만, 대부분의 게임은 데이터를 전달해야 합니다: "얼마나 많은 데미지?", "어떤 아이템?", "어디에 생성?". 이 데모는 커스텀 이벤트 클래스를 작성하지 않고도 표준 C# 및 Unity 타입을 이벤트 매개변수로 전달할 수 있는 제네릭 이벤트 시스템을 보여줍니다.
- 다양한 데이터 타입에 대한 제네릭 이벤트를 생성하는 방법
- 시스템이 타입 안전 이벤트 클래스를 자동 생성하는 방법
- 매개변수가 있는 이벤트를 발동하고 받는 방법
- 에디터에서의 타입 안전성 강제
🎬 데모 씬
Assets/TinyGiants/GameEventSystem/Demo/02_BasicTypesEvent/02_BasicTypesEvent.unity
씬 구성
UI 레이어 (Canvas):
- 🎮 네 개의 버튼 - 화면 하단에 위치
- "Raise (String)" →
BasicTypesEventRaiser.RaiseString()트리거 - "Raise (Vector3)" →
BasicTypesEventRaiser.RaiseVector3()트리거 - "Raise (GameObject)" →
BasicTypesEventRaiser.RaiseGameObject()트리거 - "Raise (Material)" →
BasicTypesEventRaiser.RaiseMaterial()트리거
- "Raise (String)" →
게임 로직 레이어 (Demo Scripts):
-
📤 BasicTypesEventRaiser - raiser 스크립트가 있는 GameObject
- 4개의 서로 다른 제네릭 이벤트에 대한 참조 보유:
GameEvent<string>,GameEvent<Vector3>,GameEvent<GameObject>,GameEvent<Material> - 각 버튼은 특정 데이터로 다른 raise 메서드를 트리거
- 4개의 서로 다른 제네릭 이벤트에 대한 참조 보유:
-
📥 BasicTypesEventReceiver - receiver 스크립트가 있는 GameObject
- Game Event Editor의 시각적 바인딩을 통해 모든 4개의 이벤트를 리스닝
- 이벤트 데이터를 적용하기 위한 다양한 씬 객체 참조
시각적 피드백 레이어 (Demo Objects):
- 📝 HoloDisplay - 수신된 문자열 메시지를 표시하는 TextMeshPro 객체
- 🎲 Cube - Vector3 이벤트가 발동될 때 이동하고 Material 이벤트가 발동될 때 색상이 변경되는 3D 객체
- 📍 TargetPosition - GameObject 이벤트의 생성 위치를 표시하는 Transform
- 🏠 Plane - 시각적 컨텍스트를 위한 지면 표면
🎮 상호작용 방법
1단계: 플레이 모드 진입
Unity에서 Play 버튼을 누릅니다.
2단계: 각 이벤트 타입 테스트
"Raise (String)" 클릭:
- 📝 HoloDisplay 텍스트가 "Hello World [count]"로 업데이트됨
- 🔢 각 클릭마다 카운터 증가
- 📊 콘솔 로그:
[Sender] Raised String Event→[Receiver] String Event Processed
"Raise (Vector3)" 클릭:
- 🎲 파란색 큐브가 무작위 위치로 순간이동
- 📊 위치가 범위 내에서 무작위화됨(-2에서 2, 0에서 3, 0)
- 📝 콘솔에 전송되고 수신된 정확한 좌표 표시
"Raise (GameObject)" 클릭:
- 🎁 무작위 프리팹(Cube 또는 Sphere)이 TargetPosition에 생성됨
- 🔄 새 것을 생성하기 전에 이전 생성물이 파괴됨
- 📝 콘솔에 인스턴스화된 프리팹 로그
"Raise (Material)" 클릭:
- 🎨 큐브가 무작위 색상(빨강/녹색/파랑/노랑)으로 변경됨
- ✨ 머티리얼 변경이 즉시 적용됨
- 📝 콘솔에 적용된 머티리얼 이름 로그
🏗️ 씬 아키텍처
이벤트 정의
Game Event Editor 창을 열어 4개의 사전 구성된 이벤트를 확인하세요:
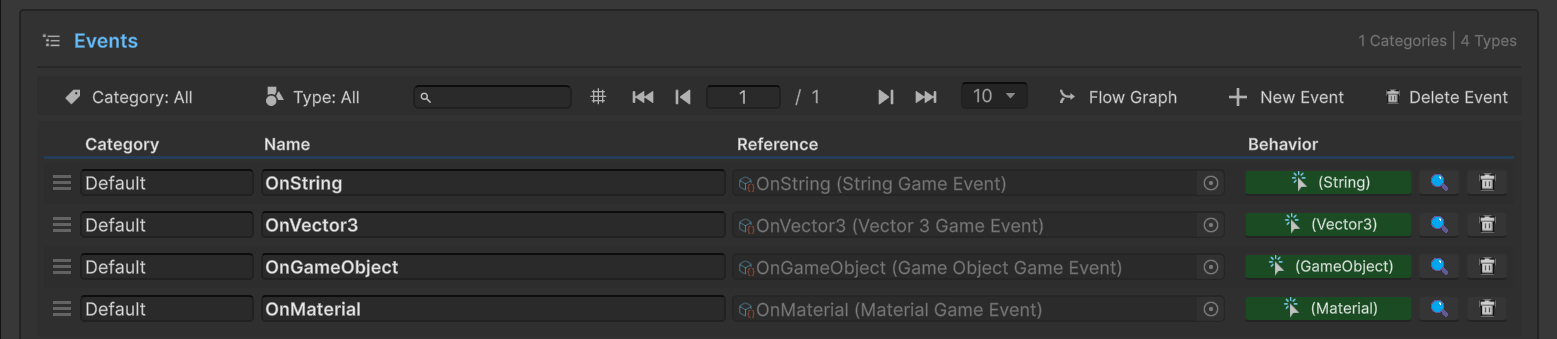
데이터베이스의 이벤트:
| 이벤트 이름 | 타입 | 목적 |
|---|---|---|
OnString | GameEvent<string> | 텍스트 디스플레이 업데이트 |
OnVector3 | GameEvent<Vector3> | 위치/이동 데이터 전송 |
OnGameObject | GameEvent<GameObject> | 생성을 위한 프리팹 참조 전달 |
OnMaterial | GameEvent<Material> | 시각적 변경을 위한 머티리얼 에셋 전송 |
Behavior 열 주목: 각 이벤트는 Behavior 열에 색상별 타입 표시기(예: (String), (Vector3))를 표시합니다. 이러한 아이콘을 클릭하면 콜백 바인딩을 구성할 수 있는 Behavior Window가 열립니다—이전 데모에서 본 것과 동일한 시각적 바인딩 시스템입니다.
StringGameEvent 또는 Vector3GameEvent 클래스를 수동으로 생성할 필요가 없습니다. 에디터에서 새 이벤트를 생성할 때 시스템이 GameEvent<T>와 같은 구체적인 타입을 자동으로 생성합니다.
Sender 설정 (BasicTypesEventRaiser)
Hierarchy에서 BasicTypesEventRaiser GameObject를 선택하세요:

구성 세부사항:
1. C# 타입 (String)
Message Event→OnString(타입 필터링된 드롭다운)Message To Send→ "Hello World" (템플릿 텍스트)
2. 수학 타입 (Vector3)
Movement Event→OnVector3Target Position→ (0, 5.41, -1.45) (참조 위치)
3. 컴포넌트 타입 (GameObject)
Spawn Event→OnGameObjectPrefabs To Spawn→ 4개의 기본 프리팹 목록(Cube, Sphere 등)
4. 에셋 타입 (Material)
Change Material Event→OnMaterialTarget Materials→ 5개의 색상별 머티리얼 목록
타입 안전성 실제 적용:
[GameEventDropdown]속성이 타입별로 이벤트를 자동 필터링- "Message Event" 슬롯에는
GameEvent<string>만 할당 가능 - 문자열 슬롯에
GameEvent<Vector3>를 할당하려는 시도는 에디터에 의해 차단됨 - 이 컴파일 타임 타입 안전성은 런타임 오류를 방지함
Receiver 설정 (BasicTypesEventReceiver)
Hierarchy에서 BasicTypesEventReceiver GameObject를 선택하여 씬 참조를 확인하세요:
씬 참조:
Log Text→ HoloDisplay (TextMeshPro 컴포넌트)Moving Cube→ Cube (Transform 컴포넌트)Changing Cube Renderer→ Cube (MeshRenderer 컴포넌트)Spawn Point→ TargetPosition (Transform 컴포넌트)
Behavior 바인딩:
4개의 이벤트 각각은 Game Event Editor의 Behavior Window를 통해 해당 receiver 메서드에 바인딩됩니다(Void Event 데모에서 구성한 것과 유사):
| 이벤트 | 바인딩된 메서드 | 시그니처 |
|---|---|---|
OnString | OnMessageReceived | void (string msg) |
OnVector3 | OnMoveReceived | void (Vector3 pos) |
OnGameObject | OnSpawnReceived | void (GameObject prefab) |
OnMaterial | OnMaterialReceived | void (Material mat) |
Behavior Window의 메서드 드롭다운은 이벤트의 매개변수 타입에 따라 메서드를 자동으로 필터링합니다. GameEvent<string>의 경우 (string) 매개변수가 있는 메서드만 표시됩니다. 이것은 구성 시점에 타입 안전성을 보장합니다!
💻 코드 분석
📤 BasicTypesEventRaiser.cs (Sender)
using UnityEngine;
using TinyGiants.GameEventSystem.Runtime;
using System.Collections.Generic;

public class BasicTypesEventRaiser : MonoBehaviour
{
    [Header("1. C# Type (String)")]
    [GameEventDropdown] public GameEvent<string> messageEvent;
    public string messageToSend = "Hello World";

    [Header("2. Math Type (Vector3)")]
    [GameEventDropdown] public GameEvent<Vector3> movementEvent;
    public Vector3 targetPosition = new Vector3(0, 2, 0);

    [Header("3. Component Type (GameObject)")]
    [GameEventDropdown] public GameEvent<GameObject> spawnEvent;
    public List<GameObject> prefabsToSpawn = new List<GameObject>();

    [Header("4. Asset Type (Material)")]
    [GameEventDropdown] public GameEvent<Material> changeMaterialEvent;
    public List<Material> targetMaterials = new List<Material>();

    private int _count;
    private AudioSource _audioSource;

    /// <summary>
    /// 동적 텍스트 콘텐츠로 GameEvent<string>을 발동합니다.
    /// receiver는 다음 시그니처를 가져야 합니다: void MethodName(string value)
    /// </summary>
    public void RaiseString()
    {
        if (messageEvent == null)
        {
            Debug.LogWarning("[MessageEvent] No GameEvent assigned.");
            return;
        }

        // 증가된 카운터와 함께 동적 문자열 전달
        messageEvent.Raise($"{messageToSend} [{_count++}]");
        Debug.Log($"[Sender] Raised String Event: {messageEvent.name}");
    }

    /// <summary>
    /// 무작위 위치 데이터로 GameEvent<Vector3>을 발동합니다.
    /// 이동, 방향 또는 물리력에 유용합니다.
    /// </summary>
    public void RaiseVector3()
    {
        Vector3 randomPos = new Vector3(
            Random.Range(-2f, 2f),
            Random.Range(0f, 3f),
            0
        );

        if (movementEvent != null)
        {
            movementEvent.Raise(randomPos);
            Debug.Log($"[Sender] Raised Vector3 Event: {randomPos}");
        }
    }

    /// <summary>
    /// 프리팹 참조로 GameEvent<GameObject>를 발동합니다.
    /// Unity Object 참조를 안전하게 전달하는 것을 보여줍니다.
    /// </summary>
    public void RaiseGameObject()
    {
        if (spawnEvent != null && prefabsToSpawn != null && prefabsToSpawn.Count > 0)
        {
            GameObject randomPrefab = prefabsToSpawn[Random.Range(0, prefabsToSpawn.Count)];
            spawnEvent.Raise(randomPrefab);
            Debug.Log($"[Sender] Raised GameObject Event. Spawning: {randomPrefab?.name ?? "null"}");
        }
        else
        {
            Debug.LogWarning("[Sender] RaiseGameObject failed: Event or prefab list is null/empty.");
        }
    }

    /// <summary>
    /// 머티리얼 에셋 참조로 GameEvent<Material>을 발동합니다.
    /// 런타임 시각적 커스터마이제이션에 완벽합니다.
    /// </summary>
    public void RaiseMaterial()
    {
        if (changeMaterialEvent != null && targetMaterials != null && targetMaterials.Count > 0)
        {
            Material randomMaterial = targetMaterials[Random.Range(0, targetMaterials.Count)];
            changeMaterialEvent.Raise(randomMaterial);
            Debug.Log($"[Sender] Raised Material Event. Material: {randomMaterial?.name ?? "null"}");
        }
        else
        {
            Debug.LogWarning("[Sender] RaiseMaterial failed: Event or material list is null/empty.");
        }
    }
}
핵심 포인트:
- 🎯 제네릭 구문 -
GameEvent<T>가 다양한 타입을 자동으로 처리 - 🔒 타입 안전성 - 각 이벤트는 선언된 매개변수 타입만 받을 수 있음
- 📦 데이터 전달 -
.Raise(value)메서드가 타입이 지정된 매개변수를 받음 - 🔇 디커플링 - sender는 누가 또는 무엇이 응답하는지 알지 못함
📥 BasicTypesEventReceiver.cs (Listener)
using UnityEngine;
using TMPro;

public class BasicTypesEventReceiver : MonoBehaviour
{
    [SerializeField] private TextMeshPro logText;
    [SerializeField] private Transform movingCube;
    [SerializeField] private MeshRenderer changingCubeRenderer;
    [SerializeField] private Transform spawnPoint;

    /// <summary>
    /// Game Event Editor의 Behavior Window를 통해 'OnString' 이벤트에 바인딩됨.
    /// 시그니처: void (string)
    /// </summary>
    public void OnMessageReceived(string msg)
    {
        if (logText != null)
            logText.text = $"Received String: \n<color=yellow>{msg}</color>";

        Debug.Log($"[Receiver] String Event Processed: {msg}");
    }

    /// <summary>
    /// Game Event Editor의 Behavior Window를 통해 'OnVector3' 이벤트에 바인딩됨.
    /// 시그니처: void (Vector3)
    /// </summary>
    public void OnMoveReceived(Vector3 pos)
    {
        if (movingCube != null)
            movingCube.localPosition = pos;

        Debug.Log($"[Receiver] Moving Cube to: {pos}");
    }

    /// <summary>
    /// Game Event Editor의 Behavior Window를 통해 'OnGameObject' 이벤트에 바인딩됨.
    /// 시그니처: void (GameObject)
    /// </summary>
    public void OnSpawnReceived(GameObject prefab)
    {
        if (prefab != null && spawnPoint != null)
        {
            // 이전 생성물 지우기
            if (spawnPoint.childCount > 0)
            {
                foreach(Transform child in spawnPoint)
                    Destroy(child.gameObject);
            }

            Instantiate(prefab, spawnPoint.position, Quaternion.identity, spawnPoint);
            Debug.Log($"[Receiver] Spawned Instance of: {prefab.name}");
        }
    }

    /// <summary>
    /// Game Event Editor의 Behavior Window를 통해 'OnMaterial' 이벤트에 바인딩됨.
    /// 시그니처: void (Material)
    /// </summary>
    public void OnMaterialReceived(Material mat)
    {
        if (changingCubeRenderer != null && mat != null)
        {
            changingCubeRenderer.material = mat;
            Debug.Log($"[Receiver] Material Changed to: {mat.name}");
        }
    }
}
핵심 포인트:
- 🎯 시그니처 매칭 - 각 메서드 매개변수는 이벤트 타입과 정확히 일치해야 함
- 🔒 타입 안전성 - 에디터의 Behavior Window가 호환 가능한 메서드만 표시
- 🎨 직접 사용 - 수신된 데이터를 즉시 사용 가능(캐스팅 불필요)
- 🔇 디커플링 - receiver는 sender를 알지 못함
🔑 핵심 요점
| 개념 | 구현 |
|---|---|
| 🎯 제네릭 이벤트 | GameEvent<T>는 모든 직렬화 가능한 타입 지원 |
| 🔒 타입 안전성 | 에디터가 구성 시점에 타입 매칭 강제 |
| 🏭 자동 생성 | 수동 이벤트 클래스 생성 불필요 |
| 📦 데이터 전달 | .Raise(value)가 타입이 지정된 매개변수를 원활하게 전달 |
| 🔄 유연성 | 하나의 시스템이 문자열, 벡터, 객체, 머티리얼 등을 처리 |
제네릭 시스템은 보일러플레이트 코드를 제거합니다. StringGameEvent, Vector3GameEvent 등을 생성하는 대신 단순히 모든 타입과 함께 GameEvent<T>를 사용합니다. 시스템이 코드 생성과 타입 강제를 자동으로 처리합니다!
🎯 다음 단계
내장 타입을 전달하는 방법을 배웠습니다. 하지만 자신만의 커스텀 클래스는 어떨까요?
다음 챕터: **03 Custom Type Event**에서 커스텀 데이터 타입으로 이벤트 생성하기
📚 관련 문서
- Game Event Creator - 에디터에서 제네릭 이벤트를 생성하는 방법
- Game Event Behavior - 콜백 바인딩에 대한 상세 가이드
- Raising Events -
.Raise()메서드에 대한 API 레퍼런스 - API Reference - 완전한 제네릭 이벤트 API